








Connecting Moonlit Workflow with PingOne Data via CData Connect AI MCP Server

Moonlit enables teams to design automated workflows and AI-driven processes through flexible orchestration blocks. But when workflows must rely on live enterprise data like CRM, ERP, finance, analytics, or cloud applications, developers often resort to custom backend logic or scheduled syncs. This increases maintenance overhead and restricts workflows to stale data snapshots.
CData Connect AI solves this problem by exposing real-time access to hundreds of enterprise systems through its secure Model Context Protocol (MCP) Server. Moonlit workflows can interact with live data using a lightweight Claude-based agent service that forwards workflow questions to CData Connect AI.
This guide outlines the steps required to configure the Claude MCP agent, deploy a FastAPI endpoint for live tool access, expose the agent to Moonlit, and build workflows that operate on real-time data through CData Connect AI.
Prerequisites:
- CData Connect AI account
- Install Python 3.9+
- Anthropic API Key (Claude)
- PingOne data org with Moonlit enabled and permission to create/manage Connected Apps
Credentials checklist:
Before you begin, you'll need a few credentials mentioned below:
CData Connect AI MCP:
- USERNAME: Your CData email login
- PAT: Connect AI, go to Settings and click on Access Tokens (copy once)
- MCP_BASE_URL: https://mcp.cloud.cdata.com/mcp
Moonlit:
- Moonlit account with Workflow Builder access
- ngrok installed and authenticated
Step 1: Configure PingOne connectivity for Moonlit
Connectivity to PingOne from Moonlit is made possible through CData Connect AI Remote MCP. To interact with PingOne data from Moonlit, we start by creating and configuring a PingOne connection in CData Connect AI.
- Log into Connect AI, click Sources, and then click Add Connection
- Select "PingOne" from the Add Connection panel
-
Enter the necessary authentication properties to connect to PingOne.
To connect to PingOne, configure these properties:
- Region: The region where the data for your PingOne organization is being hosted.
- AuthScheme: The type of authentication to use when connecting to PingOne.
- Either WorkerAppEnvironmentId (required when using the default PingOne domain) or AuthorizationServerURL, configured as described below.
Configuring WorkerAppEnvironmentId
WorkerAppEnvironmentId is the ID of the PingOne environment in which your Worker application resides. This parameter is used only when the environment is using the default PingOne domain (auth.pingone). It is configured after you have created the custom OAuth application you will use to authenticate to PingOne, as described in Creating a Custom OAuth Application in the Help documentation.
First, find the value for this property:
- From the home page of your PingOne organization, move to the navigation sidebar and click Environments.
- Find the environment in which you have created your custom OAuth/Worker application (usually Administrators), and click Manage Environment. The environment's home page displays.
- In the environment's home page navigation sidebar, click Applications.
- Find your OAuth or Worker application details in the list.
-
Copy the value in the Environment ID field.
It should look similar to:
WorkerAppEnvironmentId='11e96fc7-aa4d-4a60-8196-9acf91424eca'
Now set WorkerAppEnvironmentId to the value of the Environment ID field.
Configuring AuthorizationServerURL
AuthorizationServerURL is the base URL of the PingOne authorization server for the environment where your application is located. This property is only used when you have set up a custom domain for the environment, as described in the PingOne platform API documentation. See Custom Domains.
Authenticating to PingOne with OAuth
PingOne supports both OAuth and OAuthClient authentication. In addition to performing the configuration steps described above, there are two more steps to complete to support OAuth or OAuthCliet authentication:
- Create and configure a custom OAuth application, as described in Creating a Custom OAuth Application in the Help documentation.
- To ensure that the driver can access the entities in Data Model, confirm that you have configured the correct roles for the admin user/worker application you will be using, as described in Administrator Roles in the Help documentation.
- Set the appropriate properties for the authscheme and authflow of your choice, as described in the following subsections.
OAuth (Authorization Code grant)
Set AuthScheme to OAuth.
Desktop Applications
Get and Refresh the OAuth Access Token
After setting the following, you are ready to connect:
- InitiateOAuth: GETANDREFRESH. To avoid the need to repeat the OAuth exchange and manually setting the OAuthAccessToken each time you connect, use InitiateOAuth.
- OAuthClientId: The Client ID you obtained when you created your custom OAuth application.
- OAuthClientSecret: The Client Secret you obtained when you created your custom OAuth application.
- CallbackURL: The redirect URI you defined when you registered your custom OAuth application. For example: https://localhost:3333
When you connect, the driver opens PingOne's OAuth endpoint in your default browser. Log in and grant permissions to the application. The driver then completes the OAuth process:
- The driver obtains an access token from PingOne and uses it to request data.
- The OAuth values are saved in the location specified in OAuthSettingsLocation, to be persisted across connections.
The driver refreshes the access token automatically when it expires.
For other OAuth methods, including Web Applications, Headless Machines, or Client Credentials Grant, refer to the Help documentation.

- Click Save & Test
-
Navigate to the Permissions tab in the Add PingOne Connection page and update the User-based permissions.



Add a Personal Access Token
A Personal Access Token (PAT) is used to authenticate the connection to Connect AI from Moonlit. It is best practice to create a separate PAT for each service to maintain granularity of access.
- Click on the Gear icon () at the top right of the Connect AI app to open the settings page.
- On the Settings page, go to the Access Tokens section and click Create PAT.
-
Give the PAT a name and click Create.

- The personal access token is only visible at creation, so be sure to copy it and store it securely for future use.
Step 2: Clone the agent repository & install dependencies
Begin by cloning the official CData MCP agent repository and setting up the required Python environment to prepare your project for integration.
git clone https://github.com/CDataSoftware/connect-ai-claude-agent.git
cd connect-ai-claude-agent
(Optional but recommended):
python -m venv .venv
source .venv/bin/activate   # macOS/Linux
.venv\Scripts\activate      # Windows
Install dependencies:
pip install -r requirements.txt
pip install fastapi uvicorn python-dotenv pydantic
Step 3: Configure the environment variables
Copy and configure the .env file:
cp .env.example .envUpdate values:
ANTHROPIC_API_KEY=your_anthropic_key_here
CDATA_EMAIL=your_email
CDATA_ACCESS_TOKEN=your_cdata_pat
MCP_SERVER_URL=https://mcp.cloud.cdata.com/mcp/
Step 4: Add the CData Connect AI Claude agent
Replace your agent_chatbot.py with the full version below :
#!/usr/bin/env python3
import os
import json
import base64
import asyncio
from typing import Optional, Dict, Any, List

import requests
from dotenv import load_dotenv
from anthropic import Anthropic

# Load environment variables from .env file
load_dotenv()

class MCPClient:
    """Client for interacting with CData Connect AI MCP server over HTTP."""

    def __init__(self, server_url: str, email: Optional[str] = None, access_token: Optional[str] = None):
        self.server_url = server_url.rstrip("/")
        self.session = requests.Session()

        # Default headers for MCP JSON-RPC over SSE
        self.session.headers.update(
            {
                "Content-Type": "application/json",
                "Accept": "application/json, text/event-stream",
            }
        )

        if email and access_token:
            # Basic authentication: email:personal_access_token
            credentials = f"{email}:{access_token}"
            encoded_credentials = base64.b64encode(credentials.encode()).decode()
            self.session.headers.update(
                {
                    "Authorization": f"Basic {encoded_credentials}",
                }
            )

    def _parse_sse_response(self, response_text: str) -> dict:
        """Parse Server-Sent Events (SSE) response."""
        # SSE format: event: message\n data: {...}\n\n
        for line in response_text.split("\n"):
            if line.startswith("data: "):
                data_json = line[6:]  # Remove 'data: ' prefix
                return json.loads(data_json)
        raise ValueError("No data found in SSE response")

    def list_tools(self) -> list:
        """Get available tools from the MCP server."""
        response = self.session.post(
            self.server_url,
            json={
                "jsonrpc": "2.0",
                "method": "tools/list",
                "params": {},
                "id": 1,
            },
        )
        response.raise_for_status()

        result = self._parse_sse_response(response.text)
        return result.get("result", {}).get("tools", [])

    def call_tool(self, tool_name: str, arguments: dict) -> dict:
        """Call a tool on the MCP server."""
        response = self.session.post(
            self.server_url,
            json={
                "jsonrpc": "2.0",
                "method": "tools/call",
                "params": {"name": tool_name, "arguments": arguments},
                "id": 2,
            },
        )
        response.raise_for_status()

        result = self._parse_sse_response(response.text)
        return result.get("result", {})

class MCPAgentChatbot:
    """
    AI agent chatbot for CData Connect AI using Anthropic's HTTP API.

    - Loads tools from the CData MCP server
    - Maps them to Anthropic 'tools' spec
    - Orchestrates tool_use / tool_result loop without Claude Code CLI
    """

    def __init__(self, mcp_server_url: str, email: Optional[str] = None, access_token: Optional[str] = None):
        # Anthropic client (HTTP only, no CLI)
        api_key = os.environ.get("ANTHROPIC_API_KEY")
        if not api_key:
            raise RuntimeError("ANTHROPIC_API_KEY is not set in the environment/.env")
        self.client = Anthropic(api_key=api_key)

        # Hard-coded model: do NOT use ANTHROPIC_MODEL from env
        self.model = "claude-3-haiku-20240307"
        print(f"Using Anthropic model: {self.model} (hard-coded, env ANTHROPIC_MODEL ignored)")

        # MCP client
        self.mcp_client = MCPClient(mcp_server_url, email, access_token)

        print("Connecting to CData Connect AI MCP server...")
        self.mcp_tools_list = self.mcp_client.list_tools()
        print(f"Loaded {len(self.mcp_tools_list)} tools from MCP server")

        if self.mcp_tools_list:
            print("  Available tools:")
            for tool_info in self.mcp_tools_list[:5]:
                print(f"    - {tool_info.get('name', 'unknown')}")
            if len(self.mcp_tools_list) > 5:
                print(f"    ... and {len(self.mcp_tools_list) - 5} more")

        # Convert MCP tools to Anthropic tools spec
        self.tools_for_claude = self._create_tools_for_claude()

        # Stronger instructions for tool use and final answers
        self.system_prompt = (
            "You are a helpful assistant with access to CData Connect AI tools over MCP. "
            "Use these tools to answer questions about data sources, connections, tables, and queries. "
            "When tools fail or return errors, always explain clearly what went wrong instead of "
            "continuing to call tools. After at most 3 tool calls, you MUST respond with the best "
            "possible final answer using whatever data or error messages you have."
        )

    def _create_tools_for_claude(self) -> List[Dict[str, Any]]:
        """Convert MCP tool definitions into Anthropic 'tools' format."""
        tools = []
        for t in self.mcp_tools_list:
            name = t.get("name")
            if not name:
                continue

            tools.append(
                {
                    "name": name,
                    "description": t.get("description", ""),
                    "input_schema": t.get("inputSchema", {"type": "object", "properties": {}}),
                }
            )
        return tools

    def _run_agent_sync(self, user_message: str) -> str:
        """
        Synchronous agent loop using Anthropic tools API.
        We run this in a thread from async contexts.
        """
        messages: List[Dict[str, Any]] = [
            {
                "role": "user",
                "content": user_message,
            }
        ]

        # Safety: avoid infinite loops
        max_tool_rounds = 6

        # Keep track of the last tool result so we can surface real errors
        last_tool_result_text: Optional[str] = None

        for _ in range(max_tool_rounds):
            try:
                response = self.client.messages.create(
                    model=self.model,
                    max_tokens=1024,
                    system=self.system_prompt,
                    tools=self.tools_for_claude,
                    messages=messages,
                )
            except Exception as e:
                # Surface Anthropic errors (e.g., bad model) as a normal answer
                return (
                    f"Error when calling Anthropic model '{self.model}': {e}. "
                    "Check that the model name is valid for your API key."
                )

            # Extract tool_use contents, if any
            tool_uses = [
                block
                for block in response.content
                if getattr(block, "type", None) == "tool_use"
            ]

            # If no tools requested, return the assistant's text reply
            if not tool_uses:
                texts = [
                    getattr(block, "text", "")
                    for block in response.content
                    if getattr(block, "type", None) == "text"
                ]
                texts = [t for t in texts if t]
                if texts:
                    # Include model tag to make debugging easier
                    return f"[model={self.model}] " + "\n\n".join(texts)
                # No tools and no text – dump raw response for debugging
                return f"[model={self.model}] Raw response:\n" + json.dumps(
                    response.model_dump(), indent=2
                )

            # Add the tool_use content as an assistant message
            messages.append(
                {
                    "role": "assistant",
                    "content": response.content,
                }
            )

            # For each requested tool, call the MCP server and send tool_result back
            tool_result_messages: List[Dict[str, Any]] = []
            for tu in tool_uses:
                tool_name = getattr(tu, "name", None)
                tool_use_id = getattr(tu, "id", None)
                tool_input = getattr(tu, "input", {}) or {}

                try:
                    result = self.mcp_client.call_tool(tool_name, tool_input)
                    result_text = json.dumps(result, indent=2)
                except Exception as e:
                    result_text = f"Error calling tool {tool_name}: {e}"

                # Remember the last tool result for better error messages later
                last_tool_result_text = result_text

                tool_result_messages.append(
                    {
                        "role": "user",
                        "content": [
                            {
                                "type": "tool_result",
                                "tool_use_id": tool_use_id,
                                "content": result_text,
                            }
                        ],
                    }
                )

            messages.extend(tool_result_messages)

        # Fallback if we exit loop without a final answer – but show last tool result
        if last_tool_result_text:
            return (
                f"[model={self.model}] I was unable to produce a final natural-language answer "
                f"after using tools. Here is the last tool result I received:\n\n"
                f"{last_tool_result_text}"
            )
        else:
            return f"[model={self.model}] I was unable to produce a final answer after using tools."

    async def chat_once(self, user_message: str) -> str:
        """Async wrapper around the synchronous agent loop."""
        return await asyncio.to_thread(self._run_agent_sync, user_message)

async def interactive_mode(chatbot: MCPAgentChatbot):
    """Run the chatbot in interactive CLI mode (uses same HTTP-only agent)."""
    print("\nChatbot ready! Type 'quit' to exit.\n")

    while True:
        try:
            user_input = input("You: ").strip()
            if not user_input:
                continue
            if user_input.lower() in ["quit", "exit", "q"]:
                print("Goodbye!")
                break

            response = await chatbot.chat_once(user_input)
            print(f"\nAssistant: {response}\n")

        except KeyboardInterrupt:
            print("\nGoodbye!")
            break
        except Exception as e:
            print(f"Error: {e}\n")

async def main():
    """Run the chatbot in interactive mode (for local testing)."""
    MCP_SERVER_URL = os.getenv("MCP_SERVER_URL", "https://mcp.cloud.cdata.com/mcp/")
    CDATA_EMAIL = os.environ.get("CDATA_EMAIL")
    CDATA_ACCESS_TOKEN = os.environ.get("CDATA_ACCESS_TOKEN")

    print("=== CData Connect AI Agent Chatbot ===")
    print(f"MCP Server: {MCP_SERVER_URL}\n")

    if not CDATA_EMAIL or not CDATA_ACCESS_TOKEN:
        print("CData credentials not found.")
        print("\nThis app requires your CData email and personal access token.")
        print("\nTo configure:")
        print("  set [email protected]")
        print("  set CDATA_ACCESS_TOKEN=your_personal_access_token\n")
        return

    try:
        chatbot = MCPAgentChatbot(MCP_SERVER_URL, CDATA_EMAIL, CDATA_ACCESS_TOKEN)
    except Exception as e:
        print(f"Error connecting to MCP server or Anthropic: {e}")
        return

    await interactive_mode(chatbot)

if __name__ == "__main__":
    asyncio.run(main())
This implementation:
- Uses Claude 3 Haiku
- Connects to the CData Connect AI MCP Server
- Converts MCP tools into Claude tool schema
- Handles the tool-use loop without relying on CLI wrappers
Step 5: Add the FastAPI integration layer
Below is the full api_server.py, which exposes the agent over a POST /ask endpoint :
import os
from fastapi import FastAPI, HTTPException
from pydantic import BaseModel
from agent_chatbot import MCPAgentChatbot

app = FastAPI()

# Environment variables (also loaded in agent_chatbot via load_dotenv)
CDATA_EMAIL = os.getenv("CDATA_EMAIL")
CDATA_ACCESS_TOKEN = os.getenv("CDATA_ACCESS_TOKEN")
MCP_SERVER_URL = os.getenv("MCP_SERVER_URL", "https://mcp.cloud.cdata.com/mcp/")

# Instantiate chatbot at startup
try:
    chatbot = MCPAgentChatbot(
        mcp_server_url=MCP_SERVER_URL,
        email=CDATA_EMAIL,
        access_token=CDATA_ACCESS_TOKEN,
    )
except Exception as e:
    # Fail fast if configuration is broken
    raise RuntimeError(f"Failed to initialize MCPAgentChatbot: {e}")

class AskRequest(BaseModel):
    question: str

class AskResponse(BaseModel):
    answer: str

@app.post("/ask", response_model=AskResponse)
async def ask(req: AskRequest):
    try:
        answer = await chatbot.chat_once(req.question)
        return AskResponse(answer=answer)
    except Exception as e:
        # Convert unexpected backend errors into a 500 with a readable message
        raise HTTPException(status_code=500, detail=f"Agent error: {e}")
Run the server:
uvicorn api_server:app --host 0.0.0.0 --port 8000Test the API through:
http://localhost:8000/docsStep 6: Expose the agent with ngrok
To allow Moonlit or any external application to communicate with your FastAPI agent, you need to make your local server accessible over the internet. ngrok creates a secure public URL that tunnels directly to your running FastAPI service.
- Ensure your FastAPI server is running on port 8000:
- In a separate terminal, start an ngrok tunnel to expose this port:
- ngrok will generate a publicly accessible HTTPS URL (for example: https://your-ngrok-id.ngrok-free.dev). Use this URL-specifically the /ask endpoint-inside Moonlit when configuring your Custom API Request step.
uvicorn api_server:app --host 0.0.0.0 --port 8000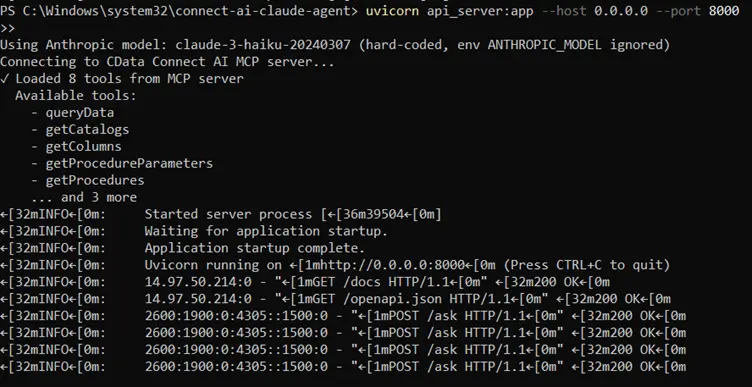
ngrok http 8000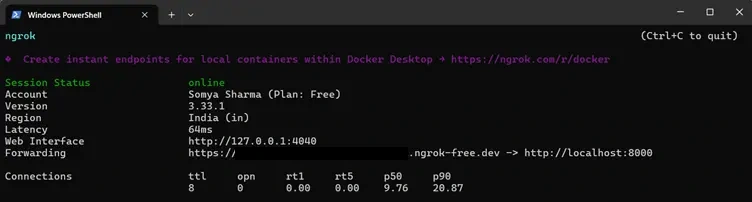
This ensures your Moonlit workflow can reach your agent service reliably during development.
Step 7: Connect the agent to Moonlit
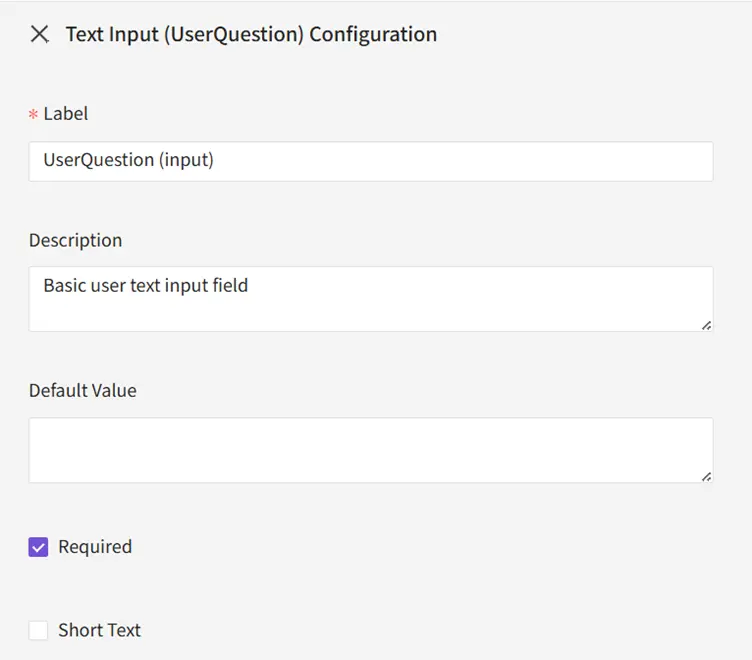
7.1 Input
Add a Text Input: UserQuestion
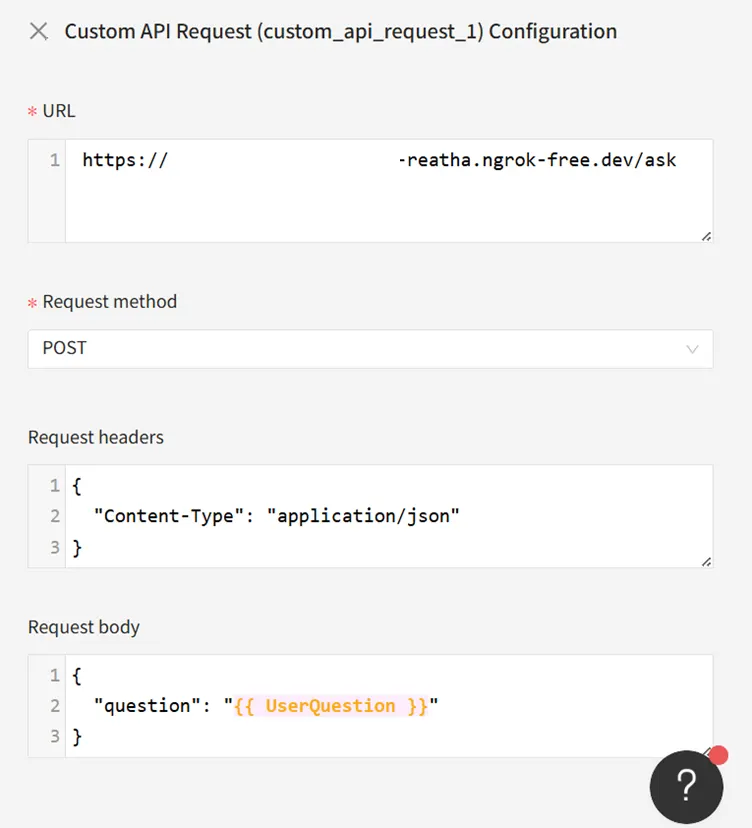
7.2 Function
Configure:
- URL: https://your-ngrok-id.ngrok-free.dev/ask
- Method: POST
- Headers: { "Content-Type": "application/json" }
- Body: { "question": "{{ UserQuestion }}" }
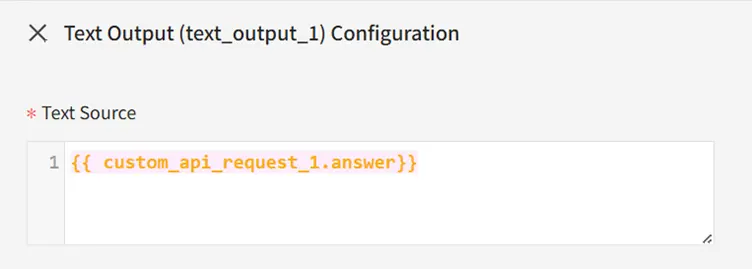
7.3 Output
Add Text Output: {{ custom_api_request_1.answer }}
Step 8: Test the complete workflow
In Moonlit's Test panel, run:
" What are the tools available in CData Connect AI MCP Server."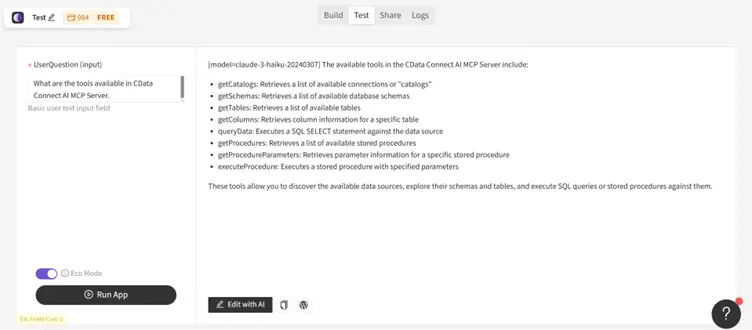
The workflow will:
- Send the input to your FastAPI service
- Forward it to Claude
- Claude will call CData MCP tools as needed
- The grounded real-time answer returns to Moonlit
Build real-time, data-aware agents with Moonlit and CData
Moonlit and CData Connect AI together enable powerful AI-driven workflows where agents have live access to enterprise data and act intelligently without sync pipelines or manual integration logic.
Start your free trial today to see how CData can empower Moonlit with live, secure access to hundreds of external systems.