








Analyze Sage 300 Data in Cognos Analytics

Cognos Analytics, powered by IBM Watson®, empowers users to cleanse and establish connections with their data while creating visualizations. When integrated with CData Connect AI, users gain immediate, real-time connectivity between cloud-based data sources and Cognos Analytics, facilitating data management, visualization, analytics, and more. This article provides step-by-step guidance on connecting to Sage 300 via CData Connect AI and subsequently analyzing Sage 300 data within Cognos Analytics.
NOTE: These instructions require Cognos Analytics 11.2.4 or higher
CData Connect AI offers a dedicated cloud-to-cloud interface for Sage 300, enabling users to perform real-time analysis on Sage 300 data within Cognos without the need to replicate data to a natively supported database. Equipped with built-in optimized data processing capabilities, CData Connect AI efficiently directs all supported SQL operations, including filters and JOINs, directly to Sage 300. This harnesses server-side processing to promptly provide the requested Sage 300 data.
Configure Sage 300 Connectivity for Cognos Analytics
Connectivity to Sage 300 from Cognos Analytics is made possible through CData Connect AI. To work with Sage 300 data from Cognos Analytics, we start by creating and configuring a Sage 300 connection.
- Log into Connect AI, click Sources, and then click Add Connection
- Select "Sage 300" from the Add Connection panel
-
Enter the necessary authentication properties to connect to Sage 300.
Sage 300 requires some initial setup in order to communicate over the Sage 300 Web API.
- Set up the security groups for the Sage 300 user. Give the Sage 300 user access to the
option under Security Groups (per each module required). - Edit both web.config files in the /Online/Web and /Online/WebApi folders; change the key AllowWebApiAccessForAdmin to true. Restart the webAPI app-pool for the settings to take.
- Once the user access is configured, click https://server/Sage300WebApi/ to ensure access to the web API.
Authenticate to Sage 300 using Basic authentication.
Connect Using Basic Authentication
You must provide values for the following properties to successfully authenticate to Sage 300. Note that the provider reuses the session opened by Sage 300 using cookies. This means that your credentials are used only on the first request to open the session. After that, cookies returned from Sage 300 are used for authentication.
- Url: Set this to the url of the server hosting Sage 300. Construct a URL for the Sage 300 Web API as follows: {protocol}://{host-application-path}/v{version}/{tenant}/ For example, http://localhost/Sage300WebApi/v1.0/-/.
- User: Set this to the username of your account.
- Password: Set this to the password of your account.

- Set up the security groups for the Sage 300 user. Give the Sage 300 user access to the
- Click Save & Test
-
Navigate to the Permissions tab in the Add Sage 300 Connection page and update the User-based permissions.



Add a Personal Access Token
When connecting to Connect AI through the REST API, the OData API, or the Virtual SQL Server, a Personal Access Token (PAT) is used to authenticate the connection to Connect AI. It is best practice to create a separate PAT for each service to maintain granularity of access.
- Click on the Gear icon () at the top right of the Connect AI app to open the settings page.
- On the Settings page, go to the Access Tokens section and click Create PAT.
-
Give the PAT a name and click Create.

- The personal access token is only visible at creation, so be sure to copy it and store it securely for future use.
With the connection configured and a PAT generated, you are ready to connect to Sage 300 data from Cognos Analytics.
Connect to Sage 300 from Cognos Analytics
The steps below outline connecting to CData Connect AI from Cognos Analytics to analyze live Sage 300 data.
Download and install the CData Connect AI JDBC driver
- Open the Integrations page of CData Connect AI.
- Search for and select JDBC.
- Download and run the setup file.
- When the installation is complete, copy the JAR file (cdata.jdbc.connect.jar) from the installation directory (e.g., C:\Program Files\CData\JDBC Driver for CData Connect\lib) to the "drivers" folder in your Cognos Analytics installation directory.
Configure the Connection to CData Connect AI
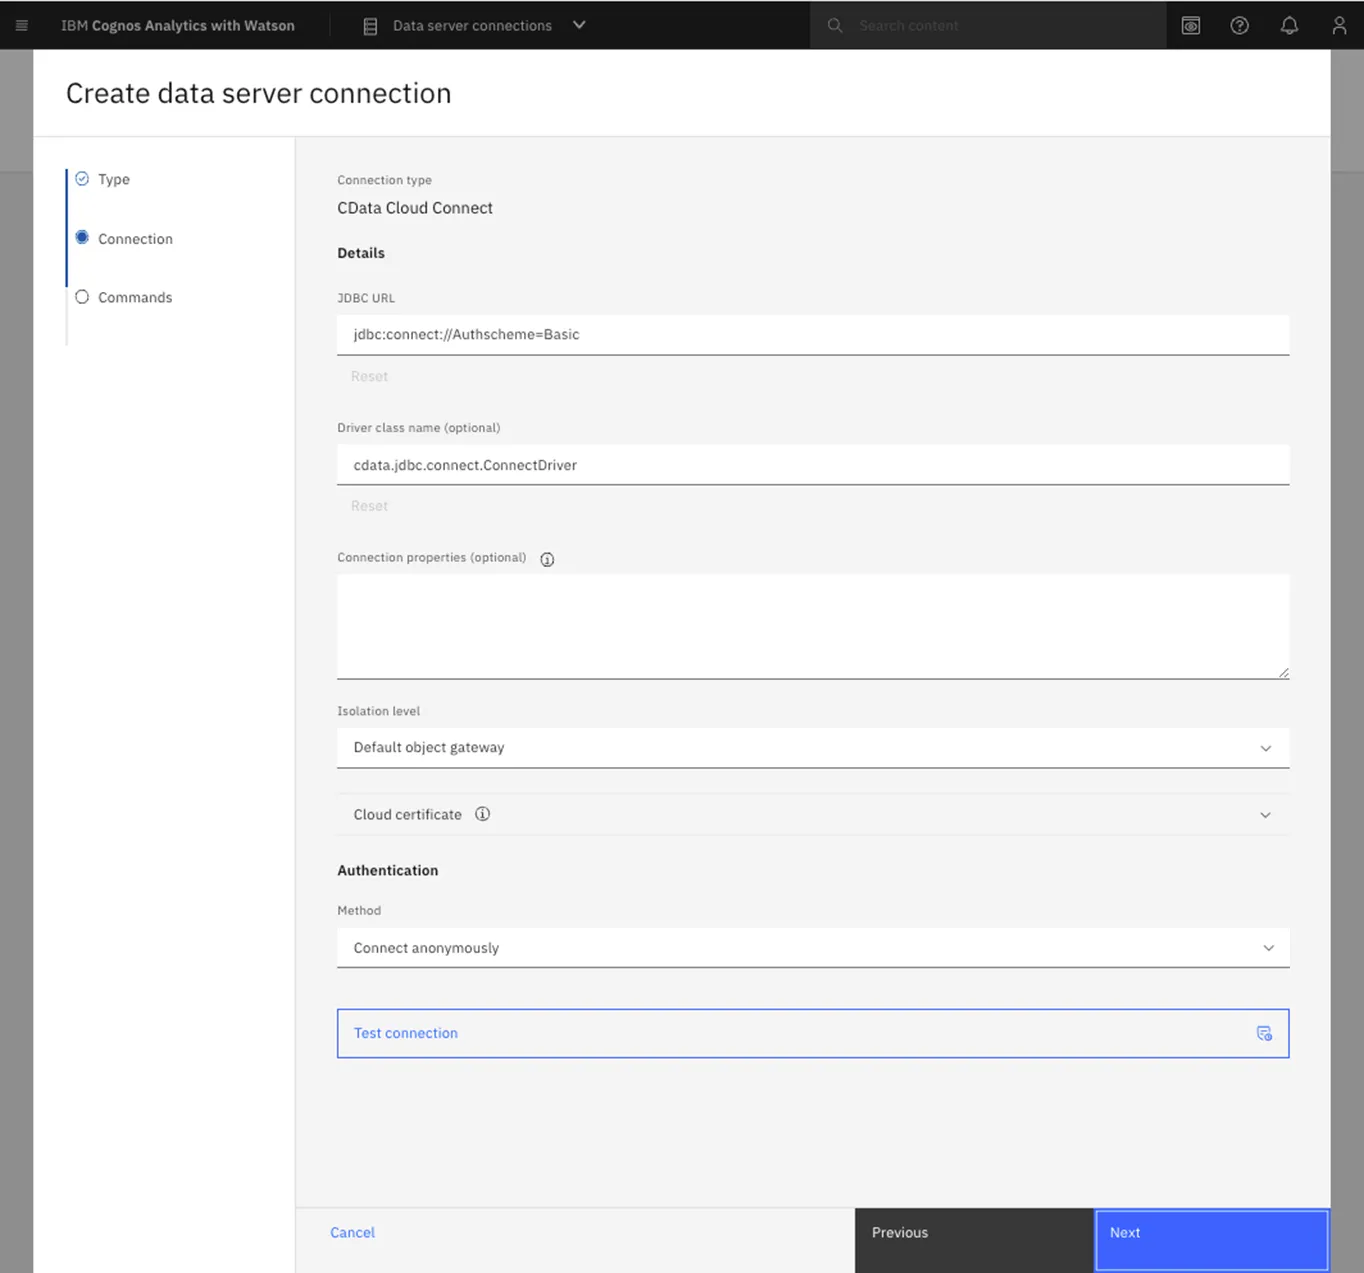
- Open IBM Cognos and navigate to Manage > Data server connections.
- Click the icon to add a data server.
- Select CData Connect AI.
- Set JDBC URL to the appropriate connection string. For example:
jdbc:connect:AuthScheme=Basic;user=username;password=PAT; - Set Driver class name to "cdata.jdbc.connect.ConnectDriver"
- Create and store authenticate credentials by selecting an authentication method
- Set Username to your CData Connect AI username (e.g., [email protected])
- Set Password to the PAT you previously generated.
- Click Test connection to confirm that the connection succeeds.
At this point, you are ready to analyze and visualize Sage 300 data in Cognos Analytics. For more information about using Cognos Analytics, please refer to the Cognos Analytics documentation.
Live Access to Sage 300 Data for Analytics
Now you have a direct, cloud-to-cloud connection to live Sage 300 data from Cognos Analytics. You can create new visualizations, build reports, and more — without replicating Sage 300 data.
Try CData Connect AI and get real-time data access to hundreds of SaaS, Big Data, and NoSQL sources directly from your cloud applications.