








Build SQL Analysis Services-Connected Applications in Kiro with CData Connect AI MCP Server

Kiro is an agentic AI IDE from AWS that takes a spec-driven approach to software development, turning a natural language prompt into a detailed spec, then into working code, tests, and documentation. Available as a desktop IDE and CLI, Kiro supports remote MCP servers natively across all plans, letting agents pull live context from enterprise systems while they build.
By integrating Kiro with CData Connect AI through the MCP (Model Context Protocol), Kiro agents gain the ability to query, analyze, and act on live SQL Analysis Services data directly inside any coding session. Connect AI manages authentication, security, and query optimization so you can focus on building intelligent applications, while Kiro handles spec generation, code writing, and task execution.
This article outlines the steps to configure SQL Analysis Services connectivity in Connect AI, generate the required authentication credentials, register the Connect AI MCP Server in Kiro, and verify that your agent can successfully interact with live SQL Analysis Services data during coding sessions.
Prerequisites
- Kiro account
- CData Connect AI account
- SQL Analysis Services account with valid credentials.
Step 1: Configure SQL Analysis Services Connectivity for Kiro
Connectivity to SQL Analysis Services from Kiro is made possible through Connect AI's Remote MCP Server. To interact with SQL Analysis Services data from your Kiro agent sessions, start by creating and configuring a SQL Analysis Services connection in Connect AI.
-
Log into Connect AI, click Sources, and then click Add Connection.

-
Select SQL Analysis Services from the Add Connection panel.

-
Enter the necessary authentication properties to connect to SQL Analysis Services.
To connect, provide authentication and set the Url property to a valid SQL Server Analysis Services endpoint. You can connect to SQL Server Analysis Services instances hosted over HTTP with XMLA access. See the Microsoft documentation to configure HTTP access to SQL Server Analysis Services.
To secure connections and authenticate, set the corresponding connection properties, below. The data provider supports the major authentication schemes, including HTTP and Windows, as well as SSL/TLS.
-
HTTP Authentication
Set AuthScheme to "Basic" or "Digest" and set User and Password. Specify other authentication values in CustomHeaders.
-
Windows (NTLM)
Set the Windows User and Password and set AuthScheme to "NTLM".
-
Kerberos and Kerberos Delegation
To authenticate with Kerberos, set AuthScheme to NEGOTIATE. To use Kerberos delegation, set AuthScheme to KERBEROSDELEGATION. If needed, provide the User, Password, and KerberosSPN. By default, the data provider attempts to communicate with the SPN at the specified Url.
-
SSL/TLS:
By default, the data provider attempts to negotiate SSL/TLS by checking the server's certificate against the system's trusted certificate store. To specify another certificate, see the SSLServerCert property for the available formats.
You can then access any cube as a relational table: When you connect the data provider retrieves SSAS metadata and dynamically updates the table schemas. Instead of retrieving metadata every connection, you can set the CacheLocation property to automatically cache to a simple file-based store.
See the Getting Started section of the CData documentation, under Retrieving Analysis Services Data, to execute SQL-92 queries to the cubes.

-
HTTP Authentication
- Click Save & Test.
-
Navigate to the Permissions tab in the Add SQL Analysis Services Connection page and update the User-based permissions.

Add a Personal Access Token
A Personal Access Token (PAT) is used to authenticate the connection to Connect AI from Kiro. It is best practice to create a separate PAT for each integration to maintain granular access control.
- Click the Gear icon at the top right of the Connect AI app to open Settings.
- On the Settings page, go to the Access Tokens section and click Create PAT.
-
Give the PAT a descriptive name (e.g., Kiro MCP) and click Create.

With the SQL Analysis Services connection configured and a PAT generated, Kiro can now connect to SQL Analysis Services data through Connect AI.
Step 2: Register the CData Connect AI MCP Server in Kiro
Kiro connects to external data sources through MCP servers configured in a file called mcp.json. In this step, you will open that file, add the Connect AI server details, and verify the connection.
-
Open a project folder. Kiro requires an open project before its agent features activate. When Kiro launches, click Open a project on the Getting started screen (or click Open Folder in the Explorer panel on the left). You can open any existing folder or create a new empty one, it just needs to be open.
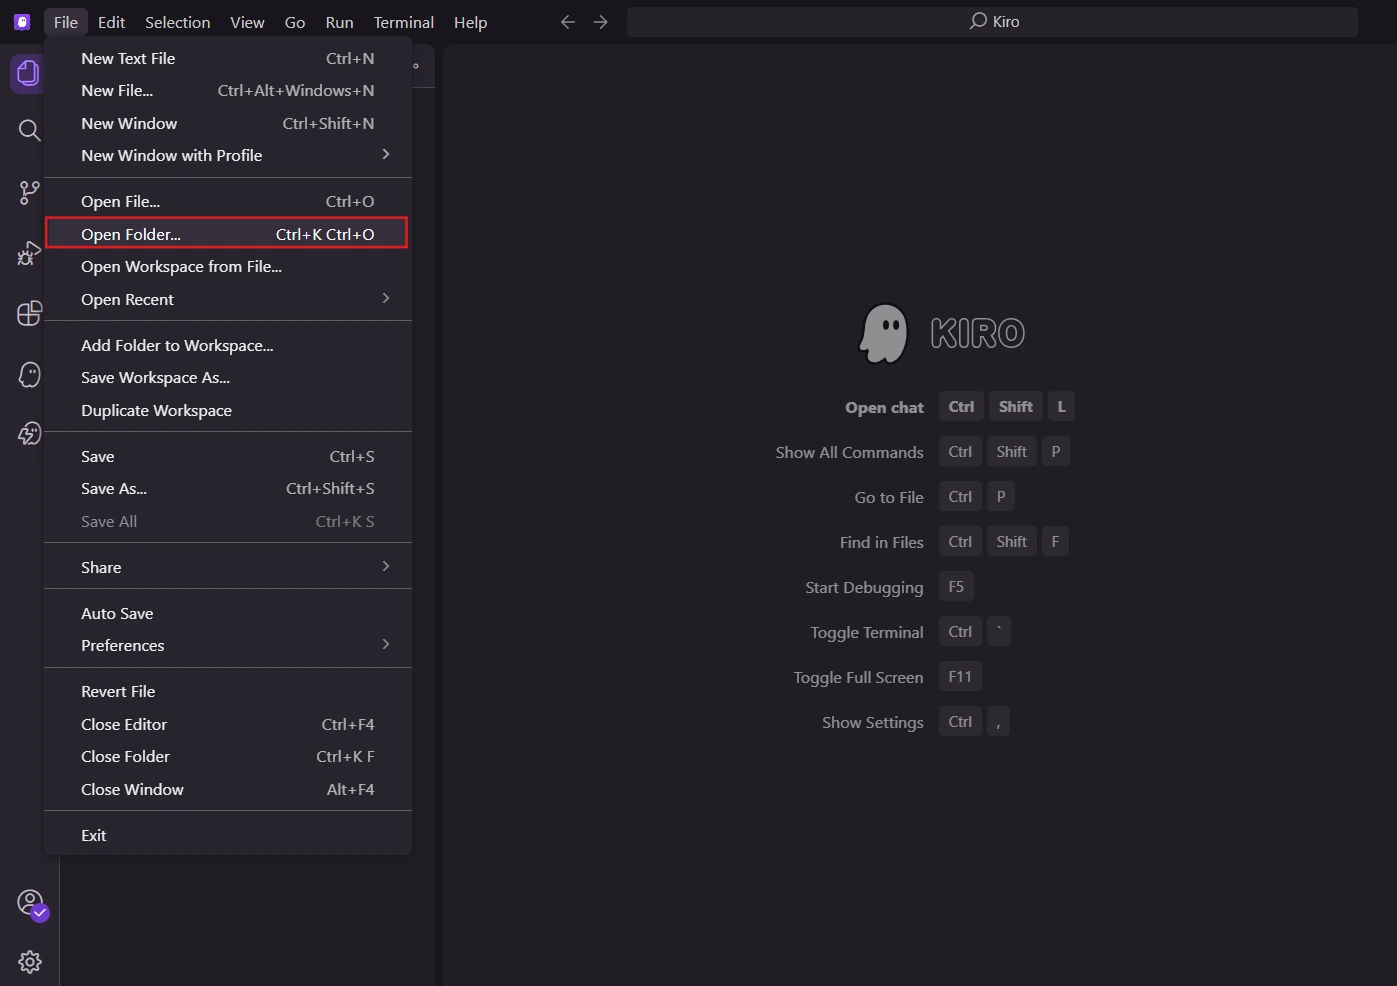
-
Open the MCP config file. Press Ctrl + Shift + P (Windows) or Cmd + Shift + P (Mac) to open the command palette. Type MCP and select Kiro: Open user MCP config (JSON). This opens the mcp.json file where you register MCP servers for Kiro.
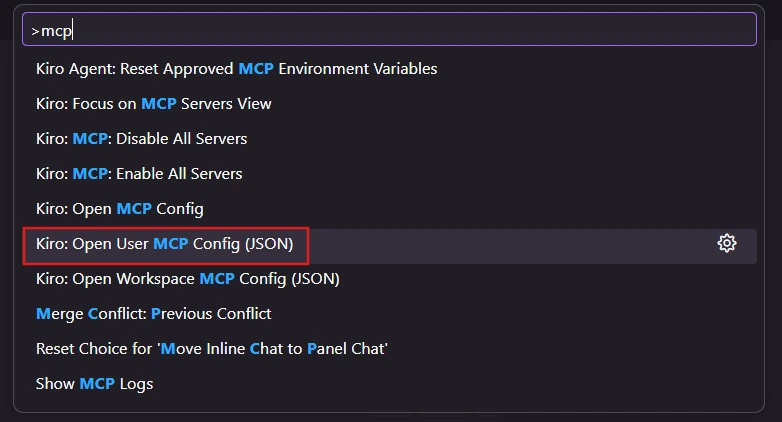
-
Generate your Base64 credentials. Kiro authenticates with Connect AI using your email and PAT, encoded together as a single Base64 string. Open a terminal and run the command for your operating system. Replace [email protected] with your Connect AI login email and YourPAT with the PAT you created in Step 1.
Windows (PowerShell):
[Convert]::ToBase64String([Text.Encoding]::UTF8.GetBytes("[email protected]:YourPAT"))Mac/Linux (Terminal):
echo -n "[email protected]:YourPAT" | base64Copy the output string. You will paste it into the config file in the next step.
-
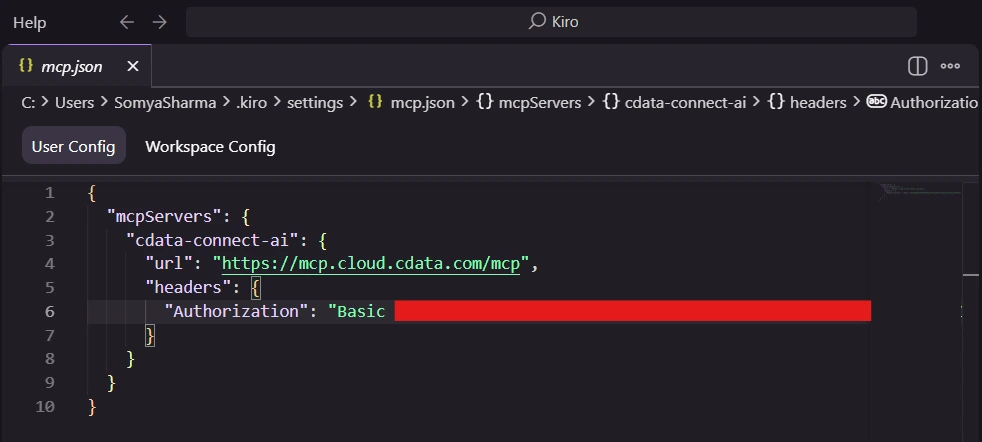
Add the Connect AI server to mcp.json. Paste the following block into your mcp.json file. Replace your_base64_string with the string you copied in the previous step:
{
  "mcpServers": {
    "cdata-connect-ai": {
      "url": "https://mcp.cloud.cdata.com/mcp",
      "headers": {
        "Authorization": "Basic your_base64_string"
      }
    }
  }
}
- Save the file. Press Ctrl + S (Windows) or Cmd + S (Mac). Kiro picks up changes to mcp.json automatically, no restart is needed.
-
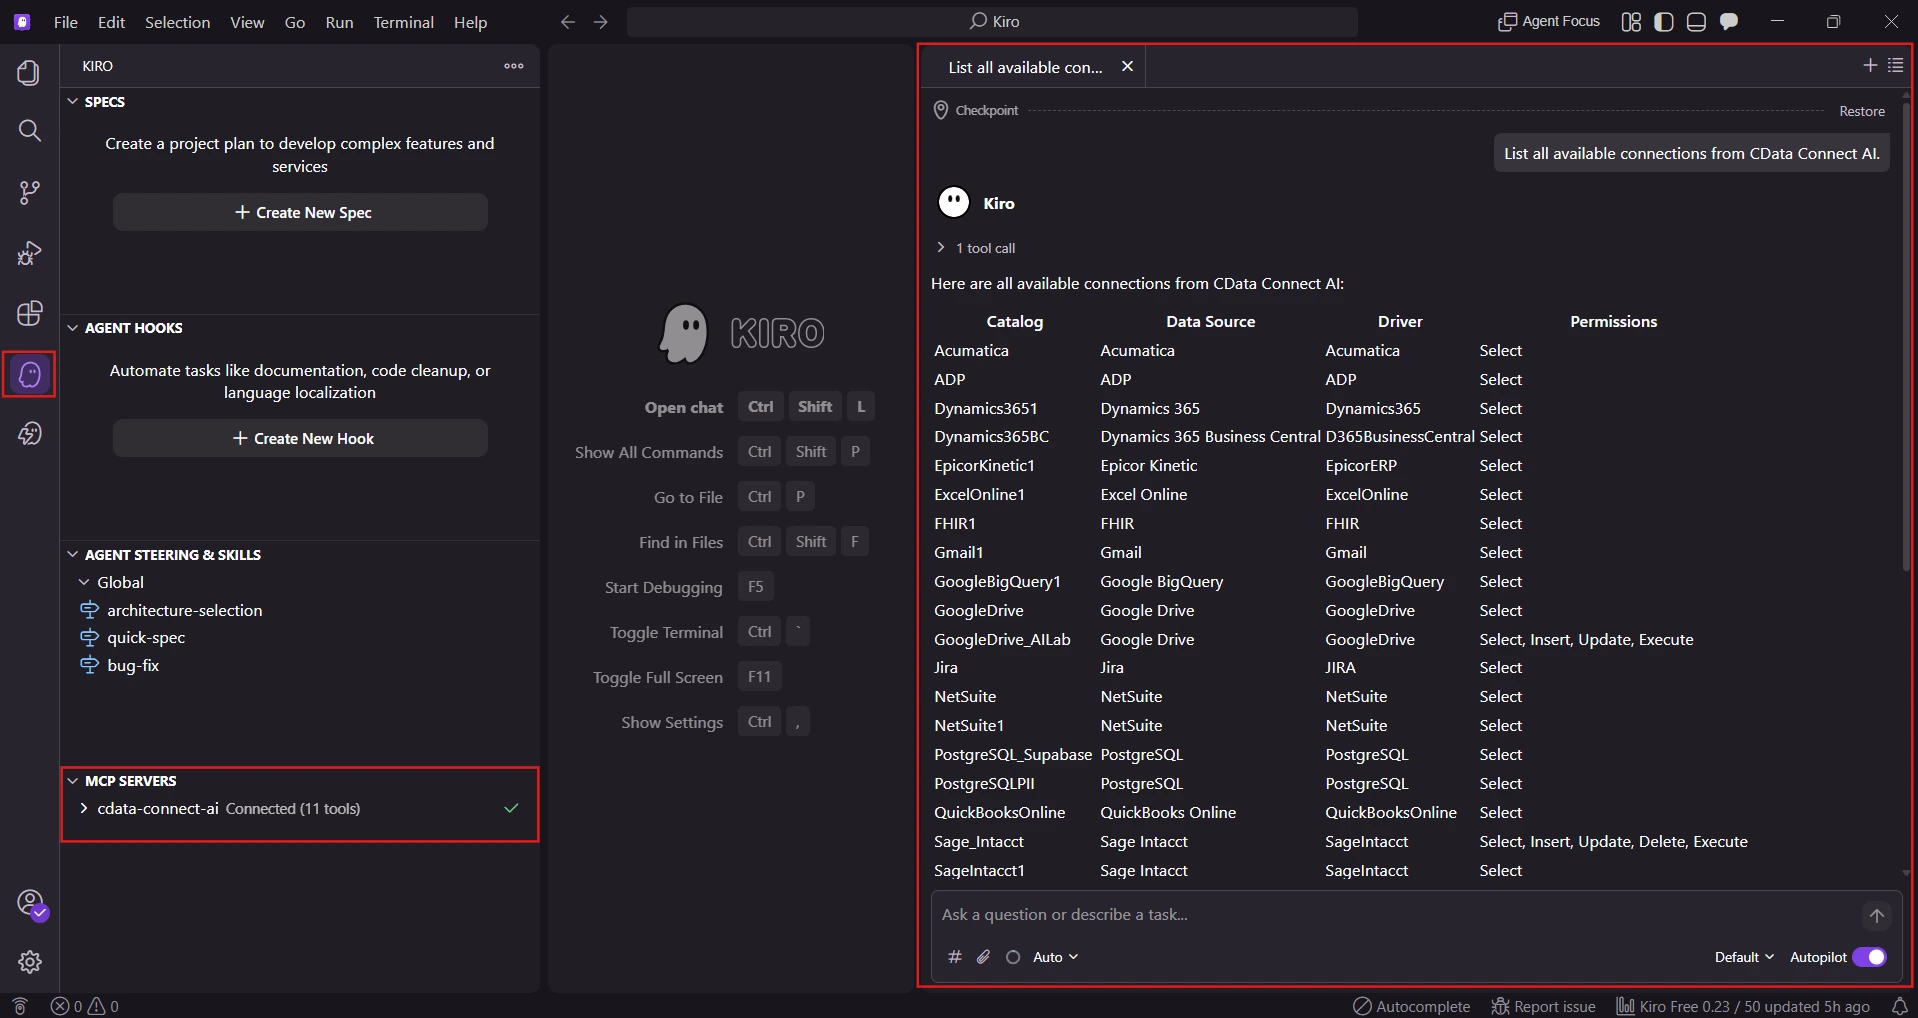
Verify the connection. Click the ghost icon in the left sidebar to open the Kiro panel. Under MCP SERVERS, you should see cdata-connect-ai with a green connected indicator. You can also confirm by typing the following in the Kiro chat panel:
List all available connections from Connect AI.If your SQL Analysis Services connection appears in the response, the MCP server is set up correctly and you are ready to query live data.
Step 3: Query Live SQL Analysis Services Data from Kiro
With the MCP server registered and verified, Kiro agents can now access your live SQL Analysis Services data directly in any session. Open the Kiro chat panel and use the following prompts to interact with your data.
The integration uses the following Connect AI MCP tools in sequence:
| MCP tool | Purpose |
|---|---|
| getCatalogs | Retrieves all available connections from Connect AI |
| getSchemas | Retrieves the database schemas for the selected connection |
| getTables | Retrieves all tables and views for the selected schema |
| queryData | Executes the generated SQL query and returns live results |
Open the Kiro chat panel and try the following prompts to interact with your SQL Analysis Services data:
- "What tables are available in my SQL Analysis Services connection?"
- "What are the top records in SQL Analysis Services data ordered by revenue?"
- "List all active SQL Analysis Services data and their current status."
- "Summarize SQL Analysis Services data activity for this quarter."
Kiro automatically discovers all CData connections, selects the most relevant connection, discovers the schema, generates, and executes the appropriate SQL query, and returns live results directly in the chat.
Build real-time, data-aware applications with Kiro and CData
Kiro and CData Connect AI together enable intelligent, AI-driven development where natural language prompts are automatically translated into live data operations across enterprise systems, without ETL pipelines, data sync jobs, or custom integration logic. This streamlined approach delivers stronger governance, lower operational overhead, and faster, more grounded responses from AI-powered agents.
Start a free trial today to see how CData Connect AI can empower Kiro with live, secure access to hundreds of enterprise systems.