








Connecting GenSpark with Sage 300 Data via CData Connect AI MCP Server

GenSpark is built for developers and enterprise teams who want to create intelligent, conversational AI experiences powered by real-time data. It's flexible tooling and agentic capabilities make it easy to integrate LLMs, automate complex workflows, and build interactive applications that adapt to user intent. However, when these AI interactions require data beyond local context or predefined APIs, many implementations fall back on custom middleware, manual integrations, or scheduled ETL pipelines to sync information into local stores. This introduces unnecessary complexity, increases maintenance overhead, slows response times, and limits the real-time intelligence your GenSpark agents can provide.
CData Connect AI eliminates these barriers by delivering live, secure connectivity to more than 300 enterprise applications, databases, ERPs, and analytics platforms. Through CData Connect AI remote Model Context Protocol (MCP) Server, GenSpark agents can query, read, and act on real-time enterprise data without replication or custom integration code. The result is grounded, accurate responses, faster reasoning, and automated, cross-system decision-making all with stronger governance and fewer moving parts.
This guide outlines the steps required to configure CData Connect AI MCP connectivity, register the MCP Server in GenSpark, and enable your GenSpark agents to work seamlessly with live enterprise data in real time.
Prerequisites
Before starting, ensure you have:
- A CData Connect AI account
- Access to GenSpark
- Access to Sage 300
Credentials checklist
Ensure you have these credentials ready for the connection:
- USERNAME: Your CData email login
- PAT: Connect AI, go to Settings and click on Access Tokens (copy once)
- MCP_BASE_URL: https://mcp.cloud.cdata.com/mcp
Step 1: Configure Sage 300 connectivity for GenSpark
Connectivity to Sage 300 from GenSpark is made possible through CData Connect AI Remote MCP. To interact with Sage 300 data from GenSpark, we start by creating and configuring a Sage 300 connection in CData Connect AI.
- Log into Connect AI, click Sources, and then click Add Connection
- Select "Sage 300" from the Add Connection panel
-
Enter the necessary authentication properties to connect to Sage 300.
Sage 300 requires some initial setup in order to communicate over the Sage 300 Web API.
- Set up the security groups for the Sage 300 user. Give the Sage 300 user access to the
option under Security Groups (per each module required). - Edit both web.config files in the /Online/Web and /Online/WebApi folders; change the key AllowWebApiAccessForAdmin to true. Restart the webAPI app-pool for the settings to take.
- Once the user access is configured, click https://server/Sage300WebApi/ to ensure access to the web API.
Authenticate to Sage 300 using Basic authentication.
Connect Using Basic Authentication
You must provide values for the following properties to successfully authenticate to Sage 300. Note that the provider reuses the session opened by Sage 300 using cookies. This means that your credentials are used only on the first request to open the session. After that, cookies returned from Sage 300 are used for authentication.
- Url: Set this to the url of the server hosting Sage 300. Construct a URL for the Sage 300 Web API as follows: {protocol}://{host-application-path}/v{version}/{tenant}/ For example, http://localhost/Sage300WebApi/v1.0/-/.
- User: Set this to the username of your account.
- Password: Set this to the password of your account.

- Set up the security groups for the Sage 300 user. Give the Sage 300 user access to the
- Click Save & Test
-
Navigate to the Permissions tab in the Add Sage 300 Connection page and update the User-based permissions.



Add a Personal Access Token
A Personal Access Token (PAT) is used to authenticate the connection to Connect AI from GenSpark. It is best practice to create a separate PAT for each service to maintain granularity of access.
- Click on the Gear icon () at the top right of the Connect AI app to open the settings page.
- On the Settings page, go to the Access Tokens section and click Create PAT.
-
Give the PAT a name and click Create.

- The personal access token is only visible at creation, so be sure to copy it and store it securely for future use.
With the connection configured and a PAT generated, we are ready to connect to Sage 300 data from GenSpark.
Step 2: Configure MCP Server in GenSpark
- Log in to GenSpark
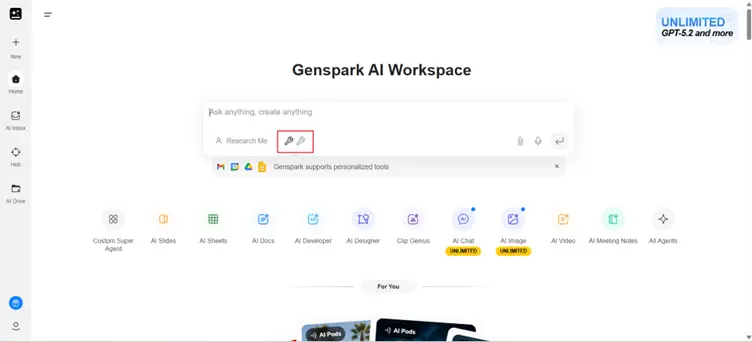
- Below the chat interface, click the Tools icon
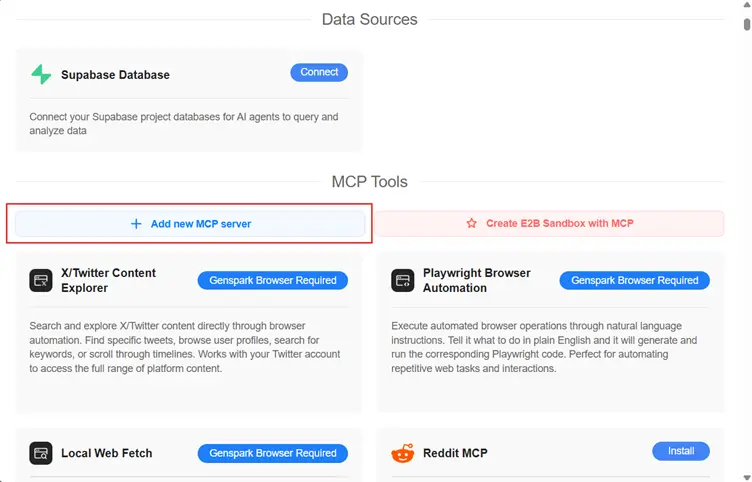
- Select Add new MCP server
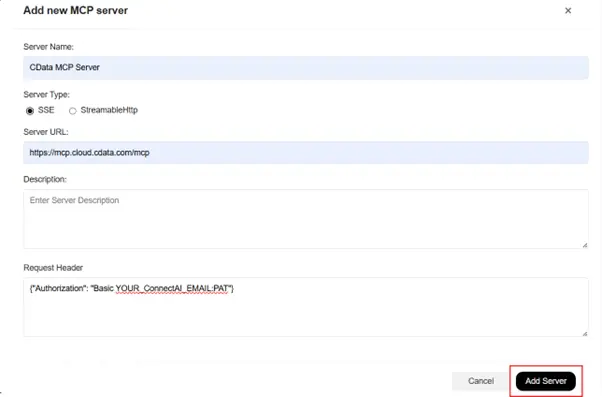
Fill in the server configuration:
NOTE: Use Basic authentication, where you combine your Connect AI email address (e.g. [email protected]) with the PAT you generated earlier (e.g. AbC123...xYz890) with a colon (:) in the Authorization header.
Field Value Name CData MCP Server (or any name you prefer) Server Type SteamableHttp Server URL https://mcp.cloud.cdata.com/mcp Request Header {"Authorization": "Basic [email protected]:AbC123...xYz890"} - Click Add Server
Once added, GenSpark will automatically load all MCP tools exposed through your Connect AI workspace.
Step 3: Query data in GenSpark
In GenSpark chat interface enter any sample prompt:
List the tools present in CData Connect AI MCP Server.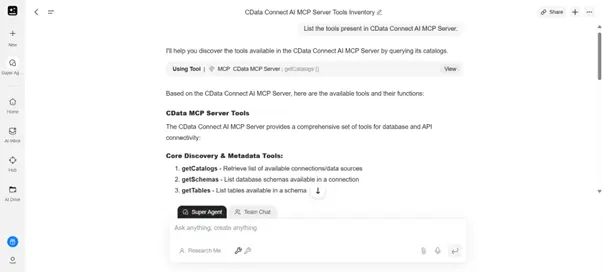
Build real-time, data-aware agents with GenSpark and CData
GenSpark and CData Connect AI together enable intelligent, AI-driven workflows where agents can securely access live enterprise data and operate with real-time awareness without ETL pipelines, data sync jobs, or custom integration logic. This streamlined approach delivers stronger governance, lower operational overhead, and faster, more grounded responses from your AI tools.
Start your free trial today to see how CData can empower GenSpark with live, secure access to hundreds of external systems.