







Use Azure AI Foundry to Talk to Your JSON Services via CData Connect AI

Azure AI Foundry is Microsoft's comprehensive platform for building, deploying, and managing AI applications and agents. It provides a unified environment for creating intelligent agents that can automate tasks, answer questions, and assist with various business processes. When combined with CData Connect AI Remote MCP, you can leverage Azure AI Foundry to interact with your JSON services in real-time. This article outlines the process of connecting to JSON using Connect AI Remote MCP and creating an agent in Azure AI Foundry to interact with your JSON services.
CData Connect AI offers a dedicated cloud-to-cloud interface for connecting to JSON services. The CData Connect AI Remote MCP Server enables secure communication between Azure AI Foundry and JSON. This allows you to ask questions and take actions on your JSON services using Azure AI Foundry agents, all without the need for data replication to a natively supported database. With its inherent optimized data processing capabilities, CData Connect AI efficiently channels all supported SQL operations, including filters and JOINs, directly to JSON. This leverages server-side processing to swiftly deliver the requested JSON services.
In this article, we show how to build an agent in Azure AI Foundry to conversationally explore (or Vibe Query) your data. The connectivity principles apply to any Azure AI Foundry agent. With Connect AI you can build AI agents with access to live JSON services, plus hundreds of other sources.
Step 1: Create an Azure AI Foundry Resource
Before connecting to JSON services, you'll need to create an Azure AI Foundry resource in your Azure portal.
- Log into the Azure Portal.
- Click Create a resource and search for Microsoft Foundry.
-
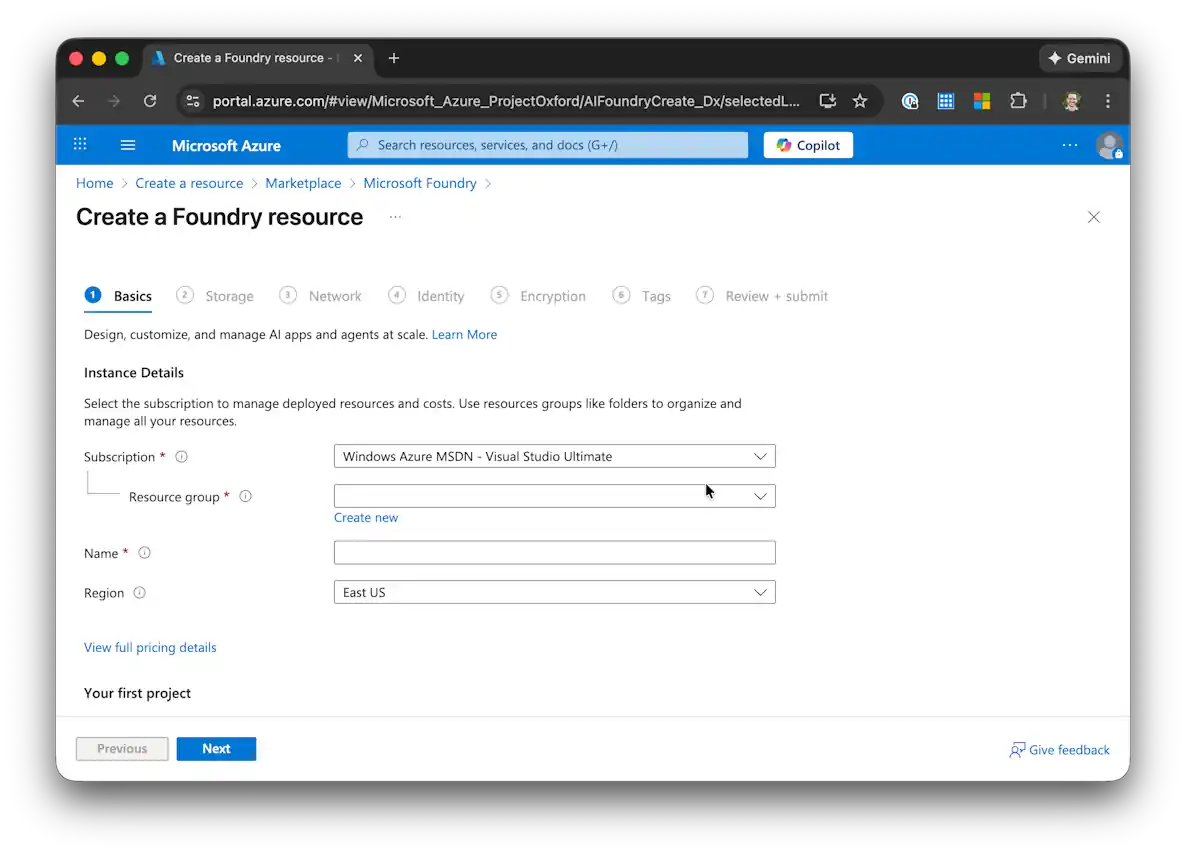
Click Create to begin the resource creation wizard.
-
In the Basics tab:
- Select or create a Resource group
- Enter a Name for your Foundry resource
- Enter a Project name
- Click Next
- Configure the Storage, Network, Identity, Encryption, and Tags tabs according to your organization's requirements, clicking Next after each section.
-
On the Review + submit tab, review your settings and click Create.
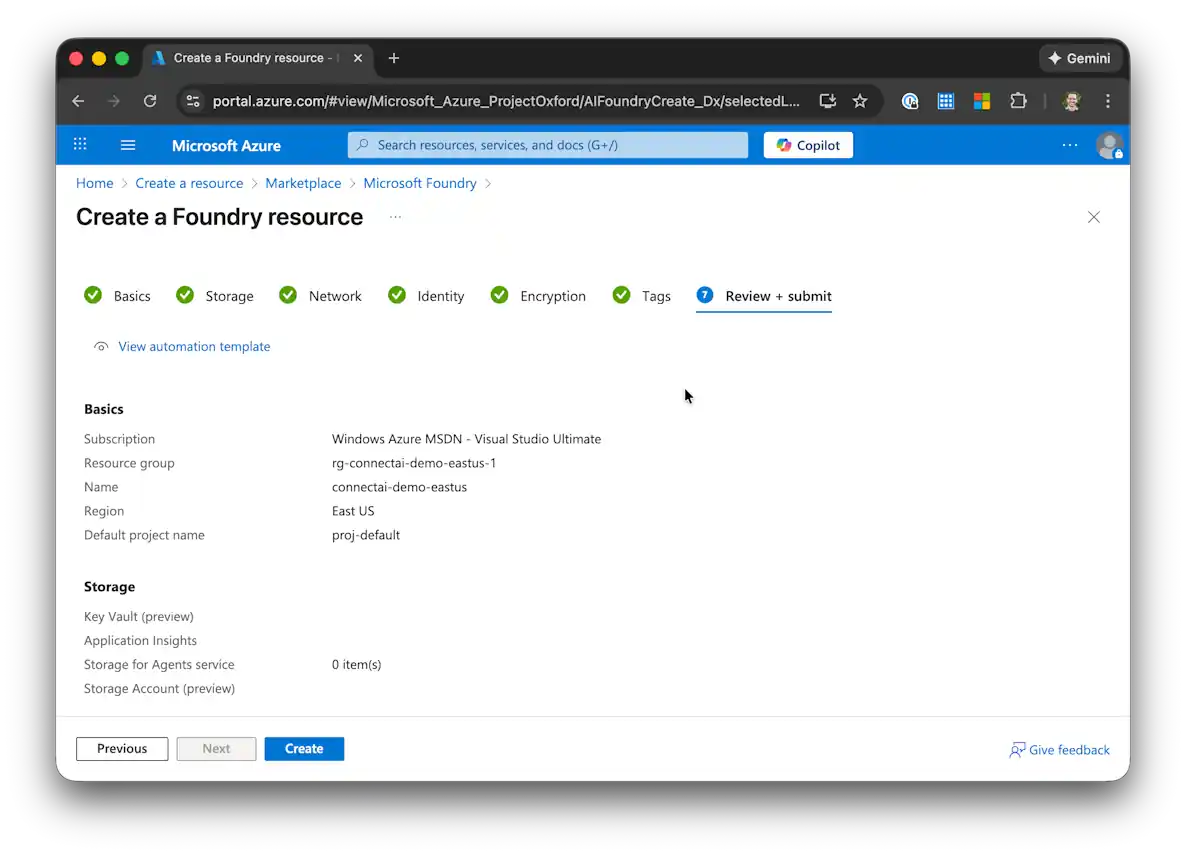
- Once the resource is created, click Go to resource.
-
Click Go to Foundry portal to access the Azure AI Foundry portal.
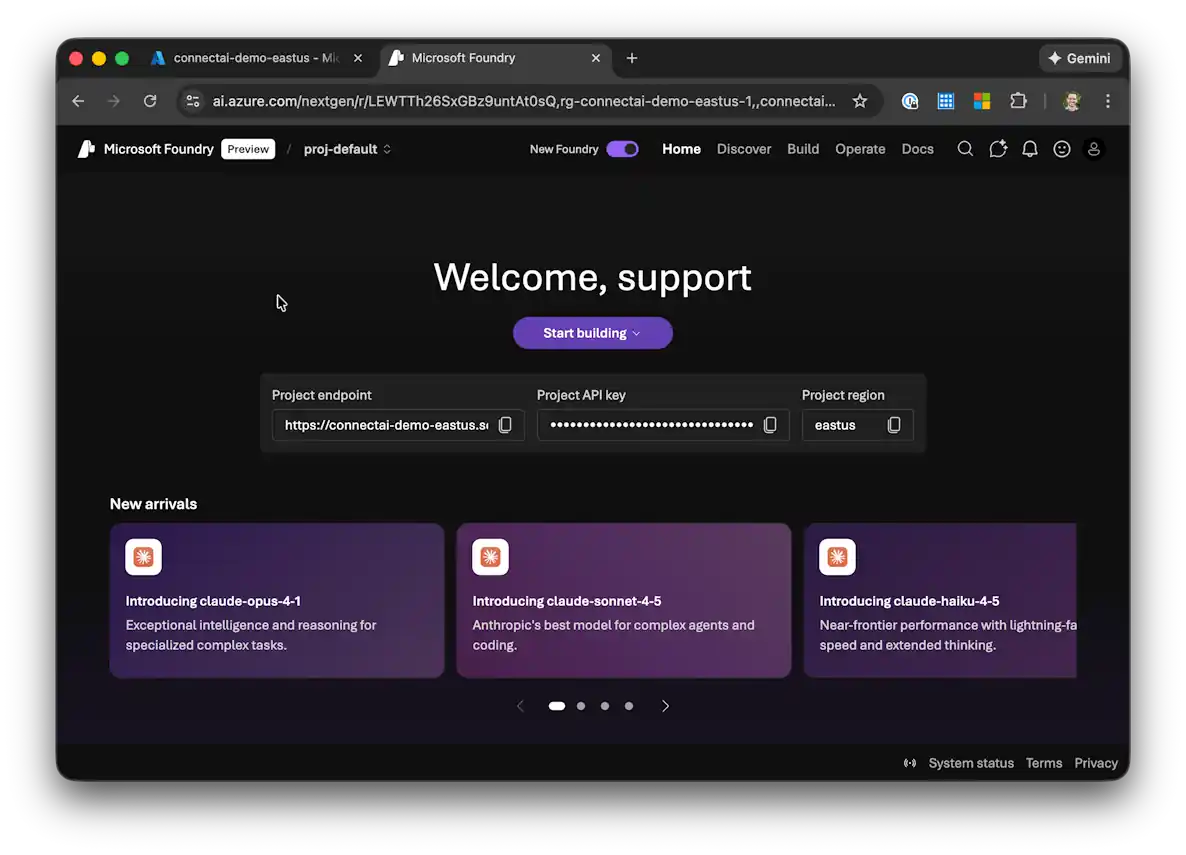
Step 2: Configure JSON Connectivity for Azure AI Foundry
Connectivity to JSON from Azure AI Foundry is made possible through CData Connect AI Remote MCP. To interact with JSON services from Azure AI Foundry, we start by creating and configuring a JSON connection in CData Connect AI.
-
Log into Connect AI, click Connections and click Add Connection

-
Select "JSON" from the Add Connection panel

-
Enter the necessary authentication properties to connect to JSON.
See the Getting Started chapter in the data provider documentation to authenticate to your data source: The data provider models JSON APIs as bidirectional database tables and JSON files as read-only views (local files, files stored on popular cloud services, and FTP servers). The major authentication schemes are supported, including HTTP Basic, Digest, NTLM, OAuth, and FTP. See the Getting Started chapter in the data provider documentation for authentication guides.
After setting the URI and providing any authentication values, set DataModel to more closely match the data representation to the structure of your data.
The DataModel property is the controlling property over how your data is represented into tables and toggles the following basic configurations.
- Document (default): Model a top-level, document view of your JSON data. The data provider returns nested elements as aggregates of data.
- FlattenedDocuments: Implicitly join nested documents and their parents into a single table.
- Relational: Return individual, related tables from hierarchical data. The tables contain a primary key and a foreign key that links to the parent document.
See the Modeling JSON Data chapter for more information on configuring the relational representation. You will also find the sample data used in the following examples. The data includes entries for people, the cars they own, and various maintenance services performed on those cars.
 Click Save & Test
-
Navigate to the Permissions tab in the Add JSON Connection page and update the User-based permissions.

Add a Personal Access Token
A Personal Access Token (PAT) is used to authenticate the connection to Connect AI from Azure AI Foundry. It is best practice to create a separate PAT for each service to maintain granularity of access.
- Click on the Gear icon () at the top right of the Connect AI app to open the settings page.
- On the Settings page, go to the Access Tokens section and click Create PAT.
-
Give the PAT a name and click Create.

- The personal access token is only visible at creation, so be sure to copy it and store it securely for future use.
With the connection configured and a PAT generated, we are ready to connect to JSON services from Azure AI Foundry.
Step 3: Create an AI Agent in Azure AI Foundry
Follow these steps to create an AI agent and connect it to CData Connect AI:
-
In the Azure AI Foundry portal, click New Foundry to create a new project.
-
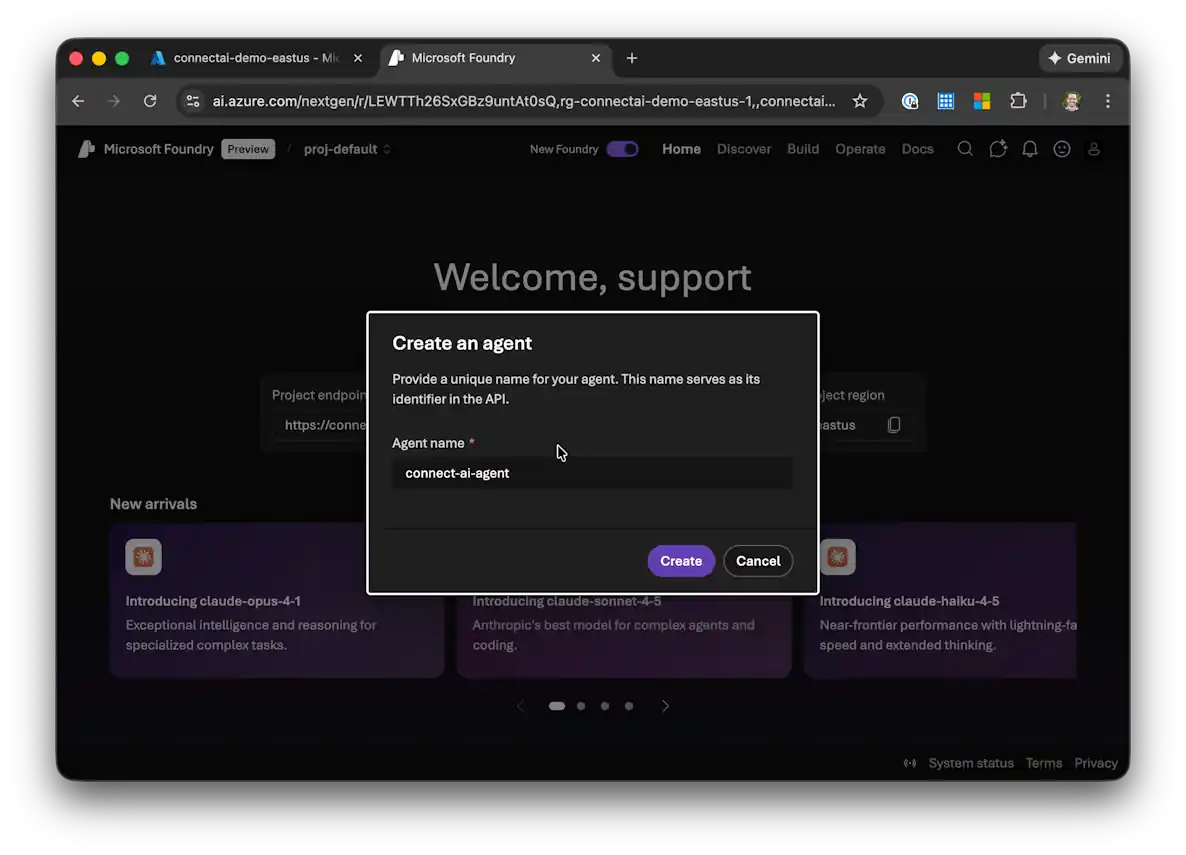
Click Start building and then select Create agent.
-
Enter a Name for your agent.
-
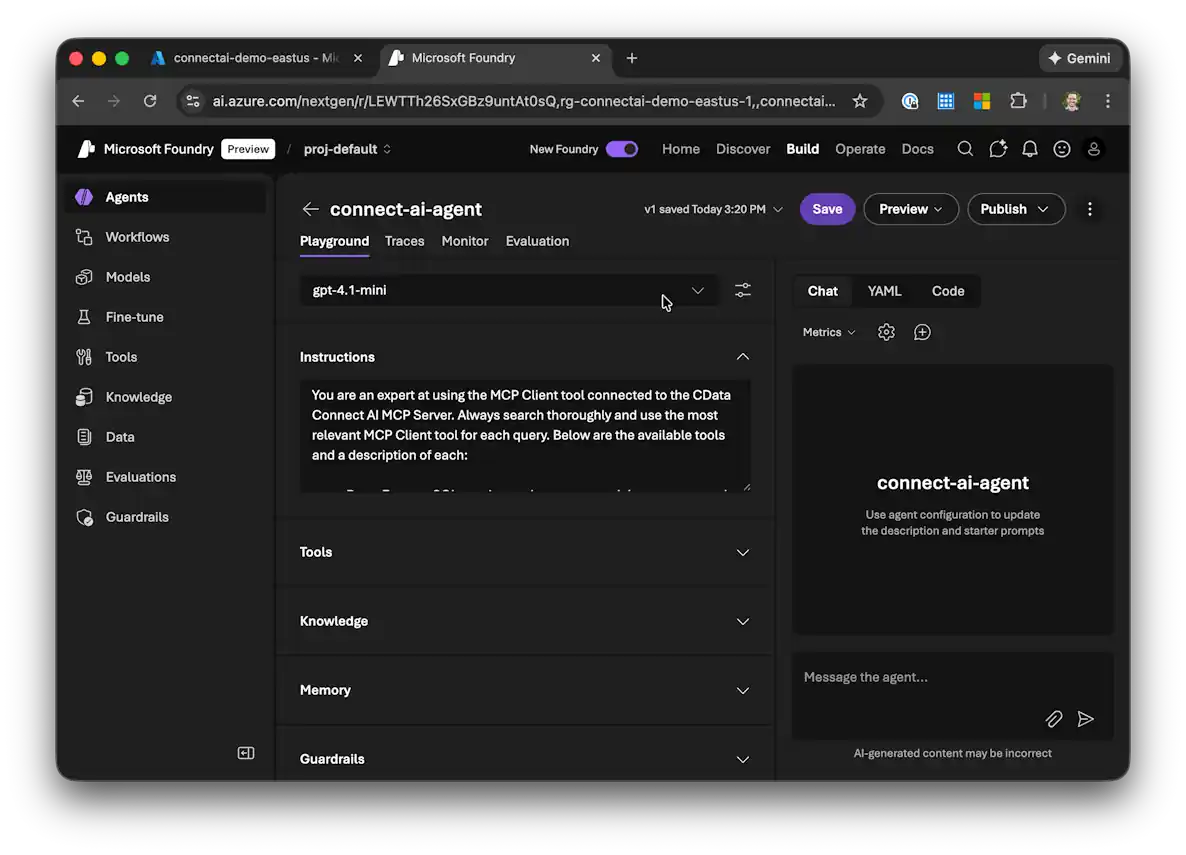
In the Setup section:
- Choose your preferred AI model
- Configure Instructions for how the agent should behave
Step 4: Add the CData Connect AI MCP Tool
Now you'll add the CData Connect AI MCP Server as a custom tool for your agent:
-
In the agent setup, navigate to the Tools section and click Add.
-
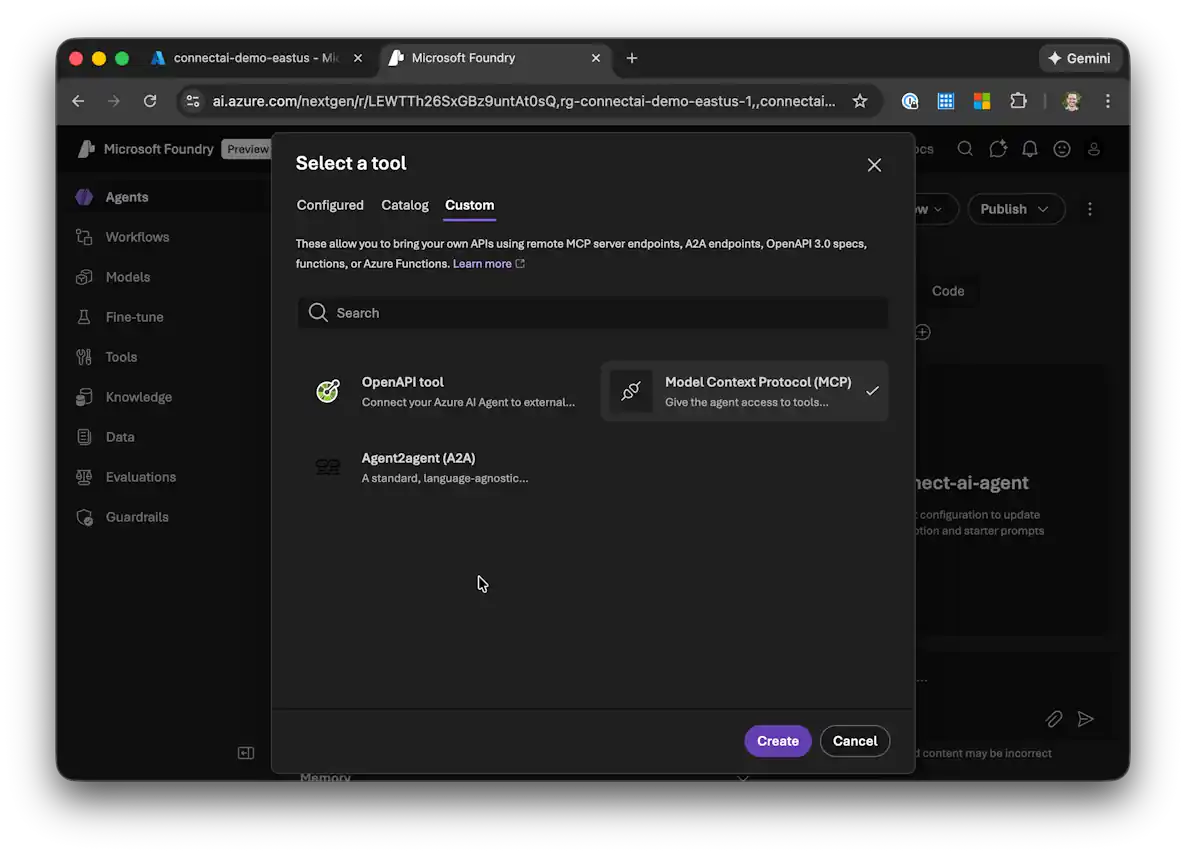
Select Custom from the tool options.
-
Choose Model Context Protocol and click Create.
-
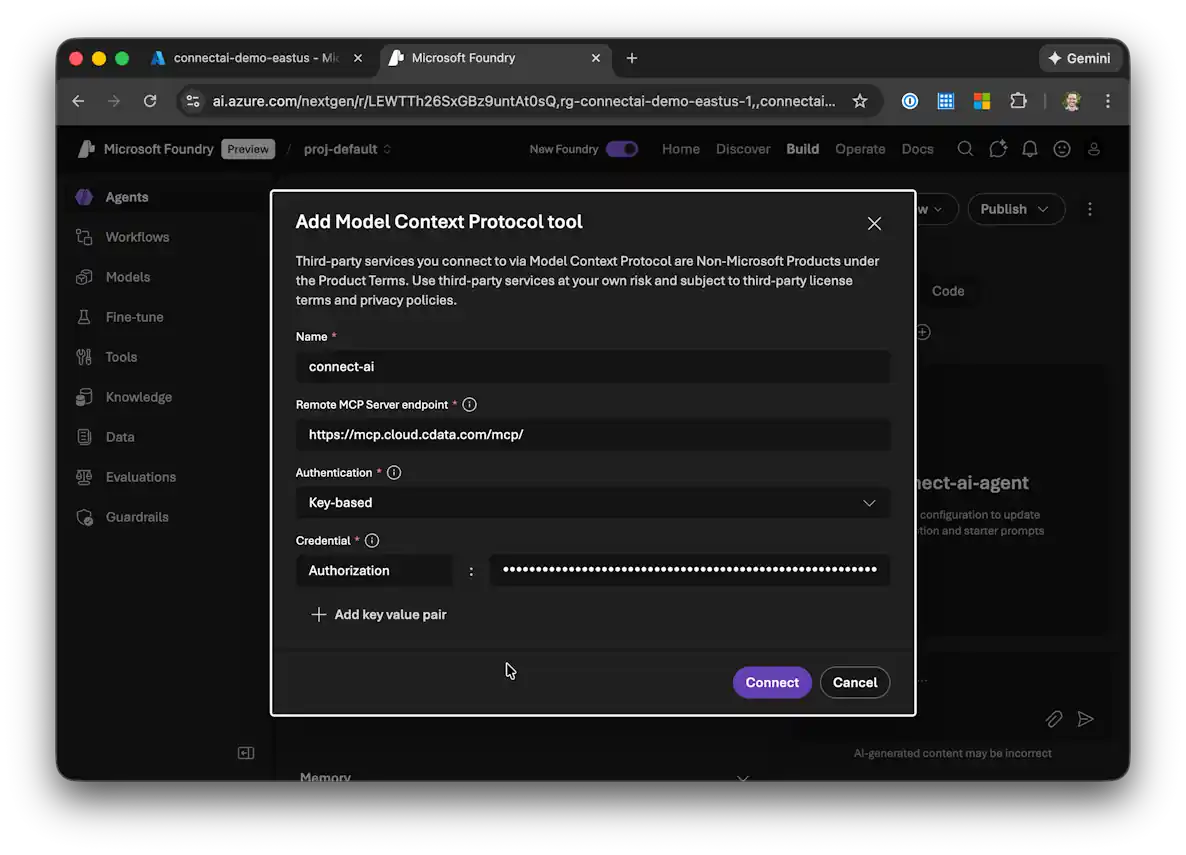
Enter a Name for the MCP tool (such as "CData Connect AI MCP Server").
-
In the Remote MCP Server endpoint field, enter: https://mcp.cloud.cdata.com/mcp/
-
For Authentication, select Key-based.
-
Configure the credential using:
- Header name: Authorization
- Value: Basic EMAIL:PAT, replacing EMAIL with your Connect AI email address and PAT with the personal access token you created earlier
-
Click Connect to establish the connection to CData Connect AI.
Optional: Provide Agent Context
You can enhance your agent's understanding by providing specific instructions about using the MCP Server tools. In the agent's Instructions section, you can add guidance such as:
You are an expert at using the MCP Client tool connected to the CData Connect AI MCP Server. Always search thoroughly and use the most relevant MCP Client tool for each query. Below are the available tools and a description of each:

queryData: Execute SQL queries against connected data sources and retrieve results. When you use the queryData tool, ensure you use the following format for the table name: catalog.schema.tableName
getCatalogs: Retrieve a list of available connections from CData Connect AI. The connection names should be used as catalog names in other tools and in any queries to CData Connect AI. Use the `getSchemas` tool to get a list of available schemas for a specific catalog.
getSchemas: Retrieve a list of available database schemas from CData Connect AI for a specific catalog. Use the `getTables` tool to get a list of available tables for a specific catalog and schema.
getTables: Retrieve a list of available database tables from CData Connect AI for a specific catalog and schema. Use the `getColumns` tool to get a list of available columns for a specific table.
getColumns: Retrieve a list of available database columns from CData Connect AI for a specific catalog, schema, and table.
getProcedures: Retrieve a list of stored procedures from CData Connect AI for a specific catalog and schema
getProcedureParameters: Retrieve a list of stored procedure parameters from CData Connect AI for a specific catalog, schema, and procedure.
executeProcedure: Execute stored procedures with parameters against connected data sources
Step 5: Chat with Your JSON Services
With your agent configured and connected to CData Connect AI, you can now interact with your JSON services using natural language:
-
In the Azure AI Foundry portal, navigate to the Chat with data section of your agent.
-
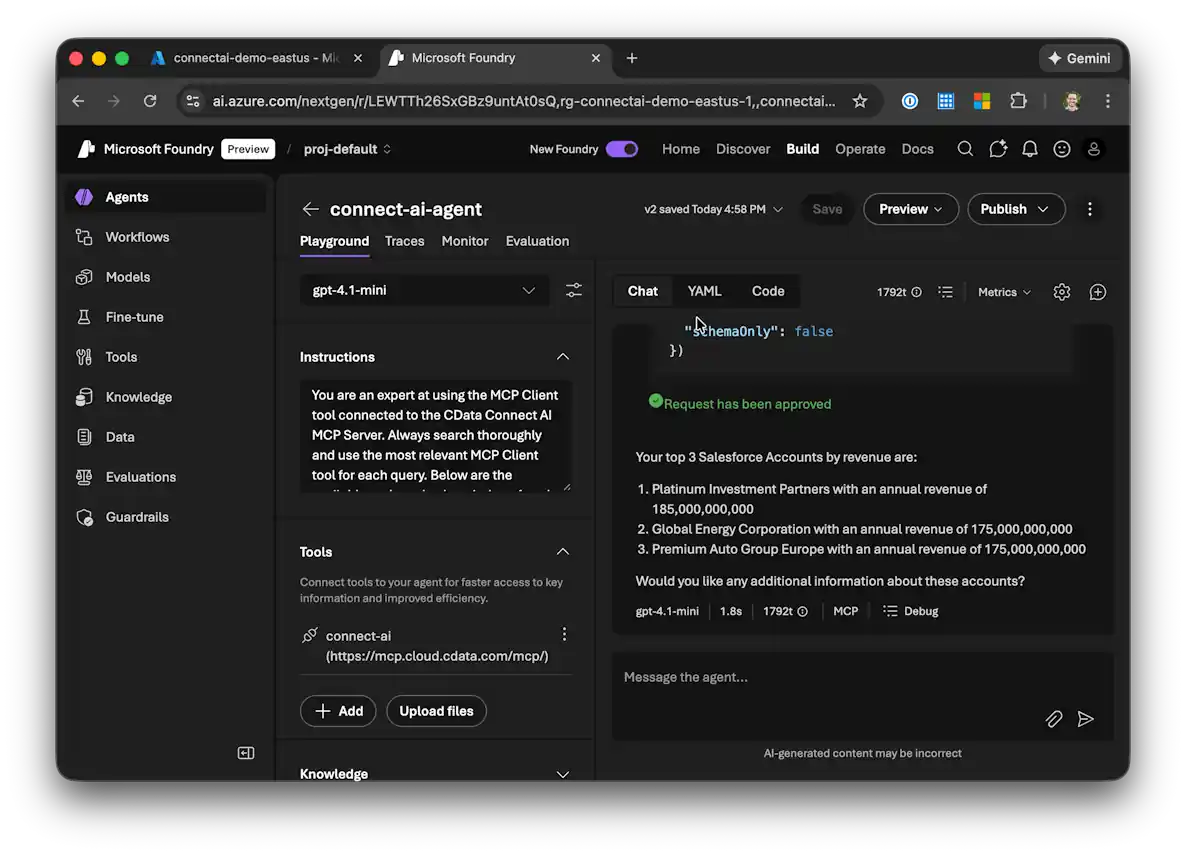
Start asking questions about your JSON services. For example:
- "Show me all customers from the last 30 days"
- "What are my top performing products?"
- "Analyze sales trends for Q4"
- "List all active projects with their current status"
-
The agent will use the CData Connect AI MCP Server to query your JSON services in real-time and provide responses based on live data.
Step 6: Publish Your Agent
Once you're satisfied with your agent's configuration and testing, click Publish to make your agent available for use in your organization.
Get CData Connect AI
To get live data access to hundreds of SaaS, Big Data, and NoSQL sources directly from your cloud applications, try CData Connect AI today!