Discover how a bimodal integration strategy can address the major data management challenges facing your organization today.
Get the Report →


Accessing Website Data Using ADO.NET
Introduction
Interacting with websites via the wide range of APIs that are on offer is attractive because it provides new possibilities but is slightly depressing because you have to find out how to do the job all over again for each API.
Now there is a better way. CData has implemented a range of common APIs as ADO.NET data providers - Google, QuickBooks, Salesforce and SharePoint, with more planned.
What this means is that if you know how to work with databases using ADO.NET there is nothing more to learn. If you don't know ADO.NET then the good news is that it is easy and generalisable - and so worth learning.
In this article we are going to look at using the Google ADO.NET data provider but the general principles are the same for any ADO.NET data provider. We are are also going to implement a desktop Windows Forms application, but again the principles apply to any platform that can work with ADO.NET - WPF and ASP.NET. This means that you can use the same ideas to implement a desktop or web application.
Getting started with ADO.NET and the Google data provider is made even easier by the use of the designers that Visual Studio has - both the full version and the Express editions. Anything that you can do using one of the designers can be done using nothing but code and in many cases code is the more direct and efficient way to implement things - but when getting started a code generator is often simpler. In this case it also gives you a more powerful strongly typed set of classes to work with.
The Google data provider gives you access to a user's Google Calendar, Contacts, Docs, email, spreadsheets and more. To make it all work you need to download the Google Data Provider trial edition from CData. Simply follow the instructions and install the data provider.
Connections
When you next start Visual Studio you can set up a new Google Data source using the Server Explorer. In a real application you would have to arrange to supply the user name and password programmatically, but the simplest way of trying things out is to supply your own Google user name and password - if you don't have one sign up for a new account, it's free after all.
Use the Add Connection command and select the CData Google Data Source as the Data Source - if you can't find this then you haven't installed the data provider.
In the Add Connection dialog box you simply need to supply the password and user name for the Google account. These will be used to create a connection string which provides the details needed to make the connection to the Google account. Before moving on to work with the connection it is worth clicking the Test Connection button. This should come back with a "Test connection succeeded" message - if not you probably haven't entered the account details correctly or there is problem with the Internet connection.
If the connection tests OK then you can also run a query to examine the data. further. How to do this is well explained in the online help so let's move on to look at easy ways of creating some code.
Start a new Windows Forms Application C# application. You can create the same application in much the same way using Visual Basic if you want or and a WPF or ASP.NET project would be created using very similar steps.
The DataSet Designer
The next task is to use the DataSet designer to create a TableAdapter which is roughly speaking a DataSet complete with a DataAdapter. However the TableAdapter is more powerful in that it is strongly typed and has some additional methods. This is one time when using a designer is not only easier it actually generates better code.
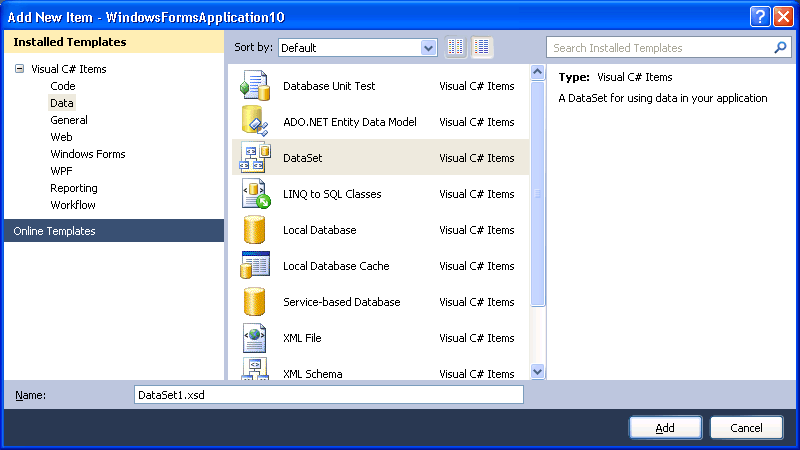
Select the project, right click and select Add,New Item. When the Add New Item dialog box appears select DataSet - you can call it anything you like but to make clear how things work the default name is used DataSet1 in this example.
Once the DataSet has been created you can make use of the DataSet Designer to create the objects you need to work with the database.
Before we do that a quick reminder of how ADO.NET works.
There are a number of .NET classes that represent the data in memory the DataTable being the main one.
There is also a DataAdapter class that makes the connection between the in memory Table and the real database.
The DataAdapter uses a "connection string" to specify the details of the connection.
The new idea in ADO.NET 4 is the TableAdapter. This is a strongly typed DataTable plus a built in DataAdapter. It also has some other useful methods and properties that make is much easier to work with than the simple DataTable and the DataSet Designer is the simplest way of creating one.
If you now look at the CData Google Data Provider in the Server Explorer you will see that there are Feeds, Views and Services. Feeds and Views are essentially data tables with feeds being read/write and views being read-only.
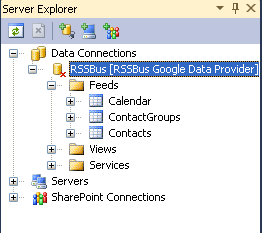
You can see that there are three data tables in the Feeds section - Calendar, Contact/Groups and Contacts.
We are going to connect to the Contacts table because the application is going to provide synchronisation between local and online contacts.
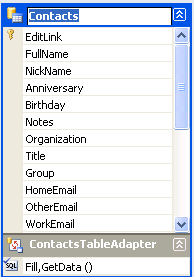
To create a DataAdapter for the Contacts table - simply drag and drop the Contacts table on the DataSet Designer. A default DataTable is created complete with all all of the columns that the Google data uses and a TableAdapter ready to be used to fill the DataTable. You can specify a SQL query as part of the DataAdapter to extract a subset of the records/columns but the default is to extract everything.
There is one small thing that we have to do to make the generated DataAdapter useful in this case. The connection string property has been set but the password has been left out as a security measure. In a real application we are probably going to have to manage the connection string in a more sophisticated way and its general form is:
Password=<password>;User=<user name>
Target Framework
Now we come to an interesting problem that is trivial but can be a puzzle if you don't know what is going on. If you try and run or build the the program as-is you will discover that you see an error message which says:
The type or namespace "CData" does not exist in the namespace (are you missing an assembly reference)
No you are not missing an assembly reference and you might be surprised that as the project consists of nothing but generated code is generating an error message.
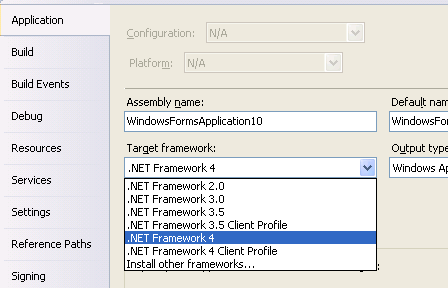
The reason for the error message is that the project by default is targeting the .NET Framework 4 Client Profile - which is a cut down project type designed to produce a very light weight application. Mostly it is exactly what you want but the ADO.NET application needs some additional assemblies and hence the error message.
To solve the problem and get rid of the error messages all you have to do is use Project Properties and change the Target Framework on the Application tab to ,NET Framework 4.
After this you can build or run the program without any problems and you don't have to make any manual changes as the warning message that pops up suggests.
Loading the data
Once again we have the choice of moving to code or continuing to work with Designers. This time switch to view the form in the Form Designer. At the top of the ToolBox you should see some new controls - DataSet1, ContactTableAdapter and TableAdapterManager.
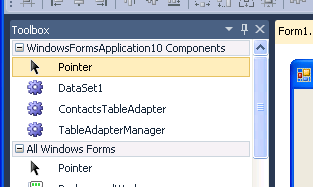
If you don't see these controls build or run the project to create them before moving on.
Next simply drag-and-drop an instance of DataSet1 and ContactsTableAdapter onto the form. All this saves us is having to create instances of the default classes and it arguable that there is little to be gained from this way of working but - it can be done.
Now we do have to write some code but not much. As placing the two generated data controls on the form has created dataSet1 and contactsTableAdapter1 we can simply start using them in code.
Place a button on the form so that we can place some code in it's event handler.
To avoid having to give fully qualified names in the code add:
using System.Data.CData.Google;
to the start of the program.
We need to set the connection string so that the DataAdapter can connect to the "database" i.e. the Google users name and password:
contactsTableAdapter1.Connection = new GoogleConnection(
	"Password=password;User=username");
We also need a DataTable of the right sort to store the records from the Google Contacts database. You can use a basic DataTable for this job but why do this when a strongly typed DataTable has been generated for you by the designer.
To create an instance of this strongly typed DataTable we have to use the DataSet:
DataSet1.ContactsDataTable MyTable= new DataSet1.ContactsDataTable();
Now we can fill the new table:
contactsTableAdapter1.Fill(MyTable);
The TableAdapter also has a GetData method which simply returns a DataTable of the correct type complete with data:
DataSet1.ContactsDataTable MyTable = contactsTableAdapter1.GetData();
At this point MyTable contains a set of record objects each record object has properties corresponding to the columns of the table and they are all of the correct type. This is the advantage of using a strongly typed DataTable.
So for example to get the FullName of the first record we could use:
string name=MyTable[0].FullName;
Notice that now we have a strongly typed table to get its advantages we have to use a strongly typed Row object.
For example to step thought the collection with a for each loop using a general DataRow type you would have to write something like:
foreach (DataRow row in MyTable) {
	name = (string) row["FullName"];
}
Notice tht you have use an index to retrieve the field and you have to cast it to the correct data type - string.
Now compare this to the strongly typed way of doing the same job:
foreach(DataSet1.ContactsRow row in MyTable) {
	name = row.FullName;
}
This works with a FullName property which is already a string so no cast is needed.
Once you have seen this sort of coding in action you should have no problem in understanding that it is a much better way to work.
Update
Now we come to the more difficult problem of updating a table. One the DataTable is loaded with data using the Fill or GetData methods you can work with the rows collection in the usual way. That is you can modify the data, delete rows etc. with out having to worry about what is happening to the data stored in the database or in the Google account in this case. However what if you want to update the external data with the changes you have made in memory?
This is where the TableAdapters Update method comes into play. In principle the Update method should be generated automatically when you create the TableAdapter but in most cases it finds it too difficult and leaves the method undefined. Fortunately it is fairly easy to create an Update method manually.
The key is to supply a SQL command that performs the update. To do this you have to supply a WHERE clause that matches up the data in the DataTable with the data in the database. In most cases the WHERE simply matches records on the key value. You also need a SET clause which stores the new data in the fields you want to change. So for example:
UPDATE table
SET field1=value1
WHERE (key=value2)
This will perform an update on table and will change only the record with key=value2 and it will change field1 to value1.
This easy enough but the TableAdapter will apply an UPDATE command to every record in the row collection clearly the UPDATE command has to use variables not constants to indicate what each field is to be updated to. What ADO.NET does is to introduce variables indicated by an @ at the front of the row property name. So for example, each ContactsRow object has a FullName property and to update the external record you would use something like
UPDATE Contacts
SET FullName=@FullName
WHERE (Editlink=@Editlink)
This will update the Contacts table matching up in memory records that have changed to table records that need to be changed by matching Edltlink to the Editlink property - which is the key for this table and so unique. Once the in memory and table records are matched the FullName field is updated by the contents of the FullName property of the row object.
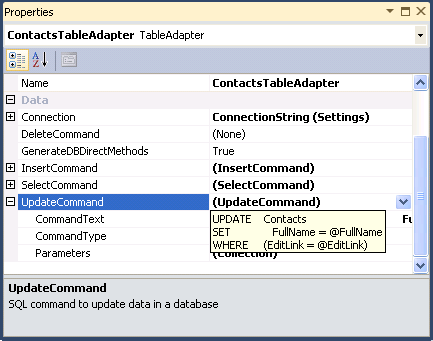
To create the Update method open the DataSet editor and examint he properties of the ContactsTableAdapter. Click on Update command and select New. Next enter the SQL command as listed above and that's all you have to do.
You can now write code like:
MyTable[0].FullName = "I Programmer";
contactsTableAdapter1.Update(MyTable);
and the Google contacts data table will be updated. Of course there is always the possibility that the update will fail for one reason or another so use a Try-Catch.
Notice that only the FullName field is updated even if you change other fields in the in memory record. To change other fields simply add them to the SQL command.
Where next
You should be able to extend the ideas explained in this article to other tables in the Google provider and even to other providers. It is a neat approach to working with web APIs. The DataSet Designer also makes life easier and more reliable. You can use its strongly typed DataSets to work with both LINQ and the Entity Framework but in most cases simply getting, modifying and updating data is all you need and ADO.NET on its own does this very well. It really is only worth thinking of more complex approaches when joins and intertable relationships have to be handled.
Data Connectors
ETL/ ELT Solutions
Cloud & API Connectivity
OEM & Custom Drivers