Discover how a bimodal integration strategy can address the major data management challenges facing your organization today.
Get the Report →Node-RED Flow: New Salesforce Accounts Add or Update QuickBooks Online Customers
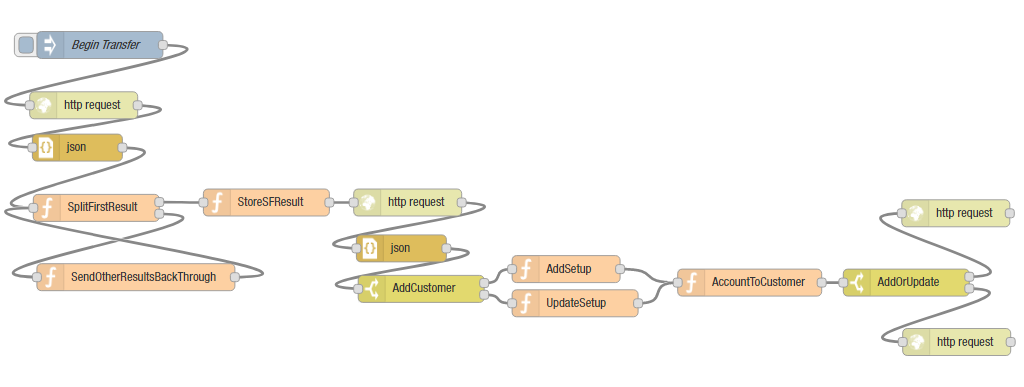
Node-RED is a tool that allows you to create data flows that incorporate hardware devices, APIs, and online services. The API Server creates REST APIs for 80+ data sources, ranging from on-premises databases to cloud-based services to flat files. By connecting to the API Server from Node-RED, you can create useful data flows for your business. This article walks through creating a flow that will query Salesforce for new accounts and then create a new QuickBooks Online customer (or update an existing one) using the same data.
Install Node-RED
To run Node-RED, you need to install Node.js. More information on this process is available from the Node.js Website. Once you have Node.js installed, the simplest way to install Node-RED is to use npm (see below). Refer to the Node-RED installation page for more information, including other methods of installation,
sudo npm install -g --unsafe-perm node-red
Set Up the API Server
To build a flow working with data from any of the 80+ supported sources, install and run the API Server. Then configure connection(s) to your data source(s). For this article, configure connections to Salesforce and QuickBooks Online. Follow the steps below to begin producing secure Salesforce and QuickBooks Online OData services:
Deploy
The API Server runs on your own server. On Windows, you can deploy using the stand-alone server or IIS. On a Java servlet container, drop in the API Server WAR file. See the help documentation for more information and how-tos.
The API Server is also easy to deploy on Microsoft Azure, Amazon EC2, and Heroku.
Connect to Salesforce
Provide the authentication values and other connection properties needed to connect to Salesforce by clicking Settings -> Connections and adding a new connection in the API Server administration console.
There are several authentication methods available for connecting to Salesforce: Login, OAuth, and SSO. The Login method requires you to have the username, password, and security token of the user.
If you do not have access to the username and password or do not wish to require them, you can use OAuth authentication.
SSO (single sign-on) can be used by setting the SSOProperties, SSOLoginUrl, and TokenUrl connection properties, which allow you to authenticate to an identity provider. See the "Getting Started" chapter in the help documentation for more information.
Connect to QuickBooks Online
Provide the authentication values and other connection properties needed to connect to QuickBooks Online by clicking Settings -> Connections and adding a new connection in the API Server administration console.
QuickBooks Online uses the OAuth authentication standard. OAuth requires the authenticating user to log in through the browser. To authenticate using OAuth, you can use the embedded OAuthClientId, OAuthClientSecret, and CallbackURL or you can obtain your own by registering an app with Intuit. You also need to specify the CompanyId.
See the Getting Started chapter of the help documentation for a guide to using OAuth.
Create Endpoints
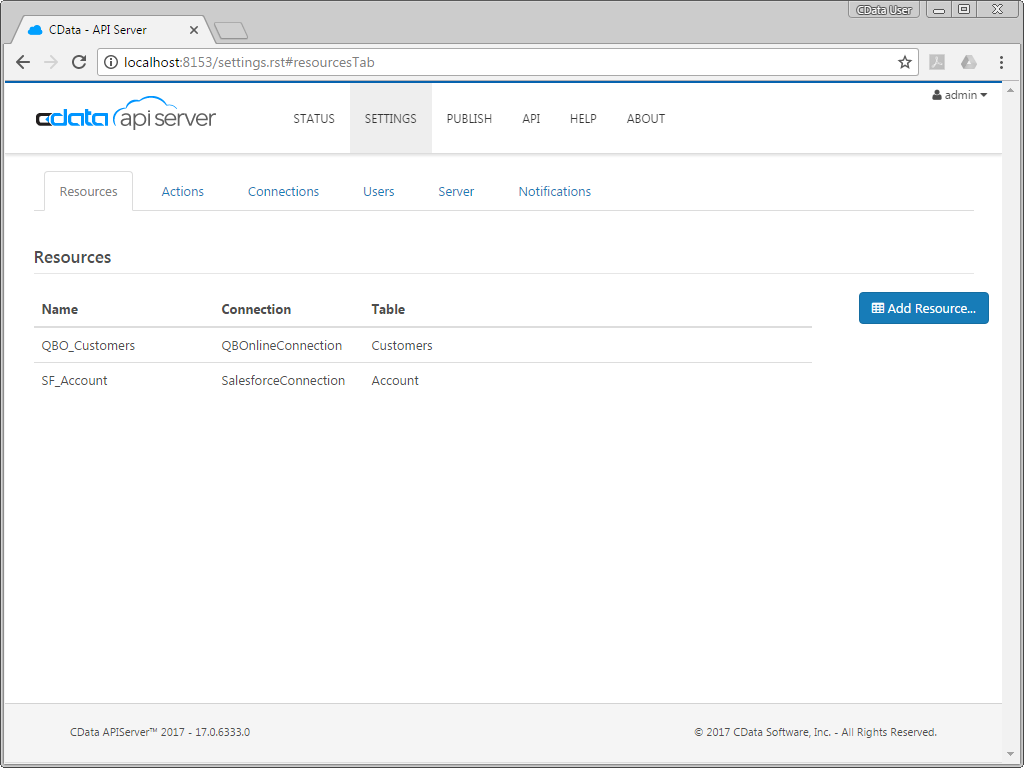
With the connections configured, choose the Salesforce and QuickBooks Online entities you want to allow the API Server to access by clicking Settings -> Resources. For this article, create endpoints for the Salesforce Account entity and the QuickBooks Online Customers entity.
Build a Node-RED Flow
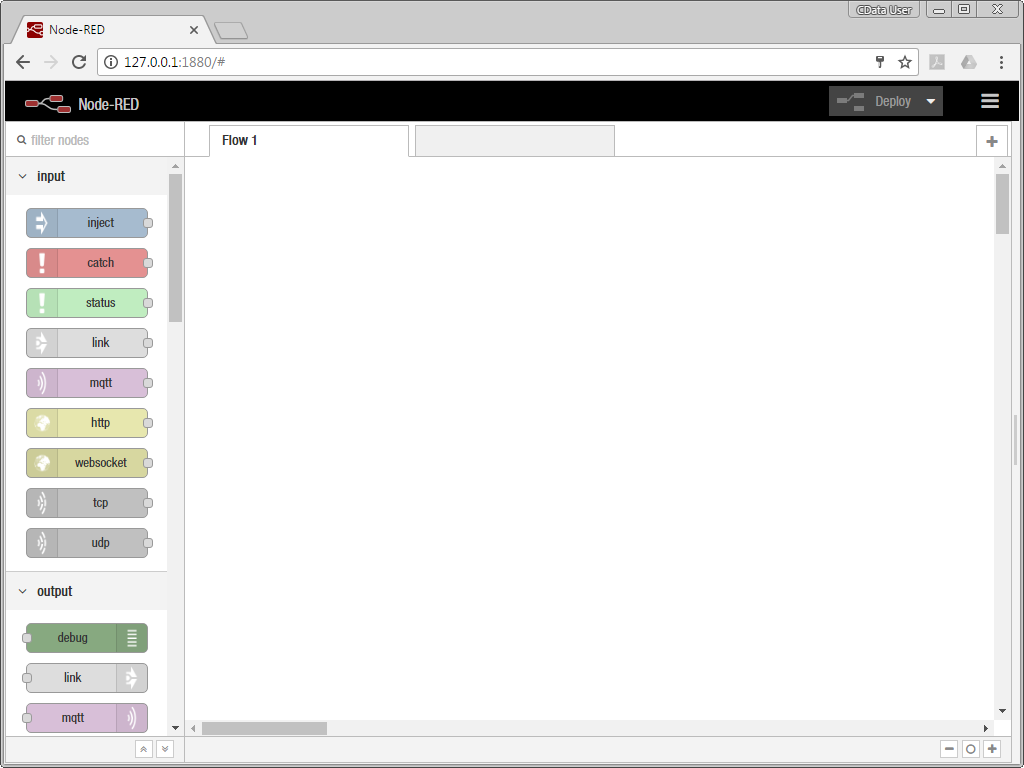
Building a Node-RED Flow to connect to and use data from the API Server is as simple as dragging and dropping components in the Node-RED interface. To start Node-RED, simply call node-red from the command line. If this is the first time you are creating a flow, you will see a blank workspace.
Create the flow using the instructions below or download the complete flow and follow along with the walkthrough.
Get Salesforce Account Data
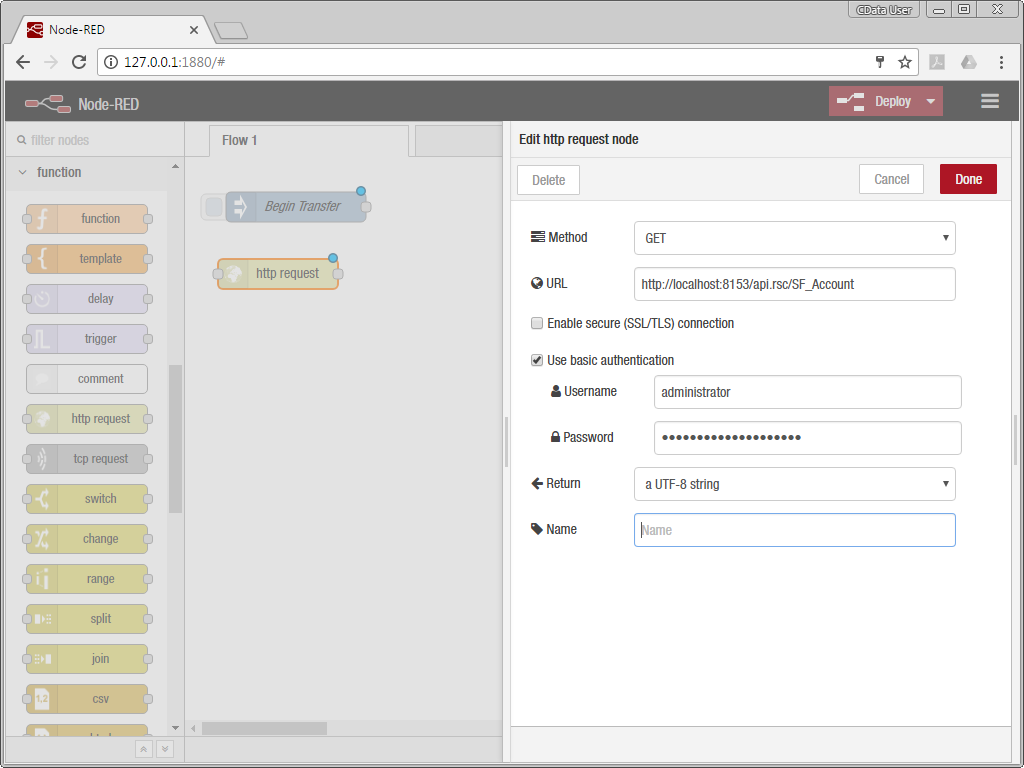
Drag an inject node onto the workspace. This is the node that is used to begin our flow. Double click the node to name it. Next, drag an http request node onto the workspace. This is the node that sends the request to the API Server to see if there are any new Salesforce accounts. Double-click the node to configure the properties of the node. In this case the node sends an HTTP GET request to the endpoint for Salesforce Account table (for incremental searching, add a $filter parameter to the URL, based on the last time you searched for accounts). For security, we're using basic authentication, based on a user we created within API Server (Settings -> Users). Connect the two nodes with a wire.
Process the Salesforce Accounts
Next, place a json node and two function nodes onto the dashboard. The json node is used to parse the response from the API Server into a JSON object. The two function nodes push the results from the HTTP request through the rest of the flow, one at a time.
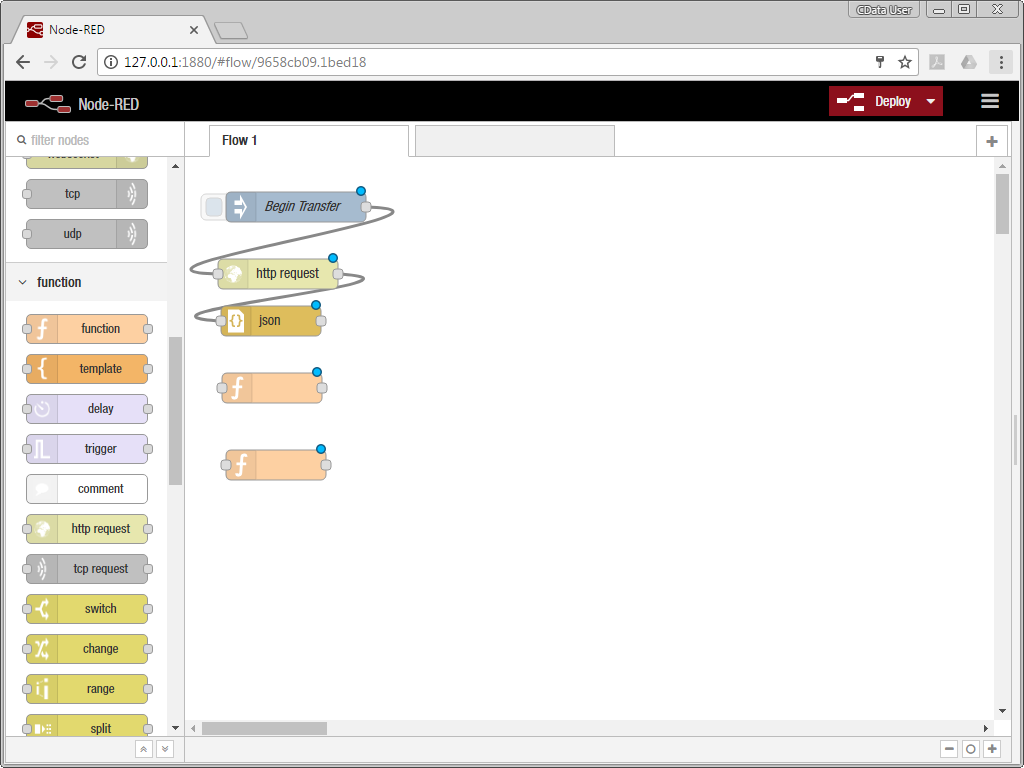 The first function node has two outputs: the first result from the array of values from msg.payload (with the account name HTML escaped) and an array containing the remaining values. Double-click the node and copy the following JavaScript into the function:
var arrLen = msg.payload.value.length;
if(arrLen > 1) {
    msg2 = {};
    msg2.payload = msg.payload.value.slice(1,arrLen);
    msg.payload = msg.payload.value[0];
    msg.escapedName = escape(msg.payload.Name);
    return [msg,msg2];
} else if (arrLen == 1) {
    msg.payload = msg.payload.value[0];
    msg.escapedName = escape(msg.payload.Name);
    //remove API Server response headers
    msg.headers = {};
    return [msg, null];
}
return [null, null];
The second of our new functions re-factors the array of remaining values into a message that matches the input for the previous function. This allows the flow to process each of the results of our HTTP request for Salesforce accounts, one at a time. Double-click the node and copy the following JavaScript into the function:
var payload = msg.payload;
msg.payload = {}
msg.payload.value = payload;
return msg;
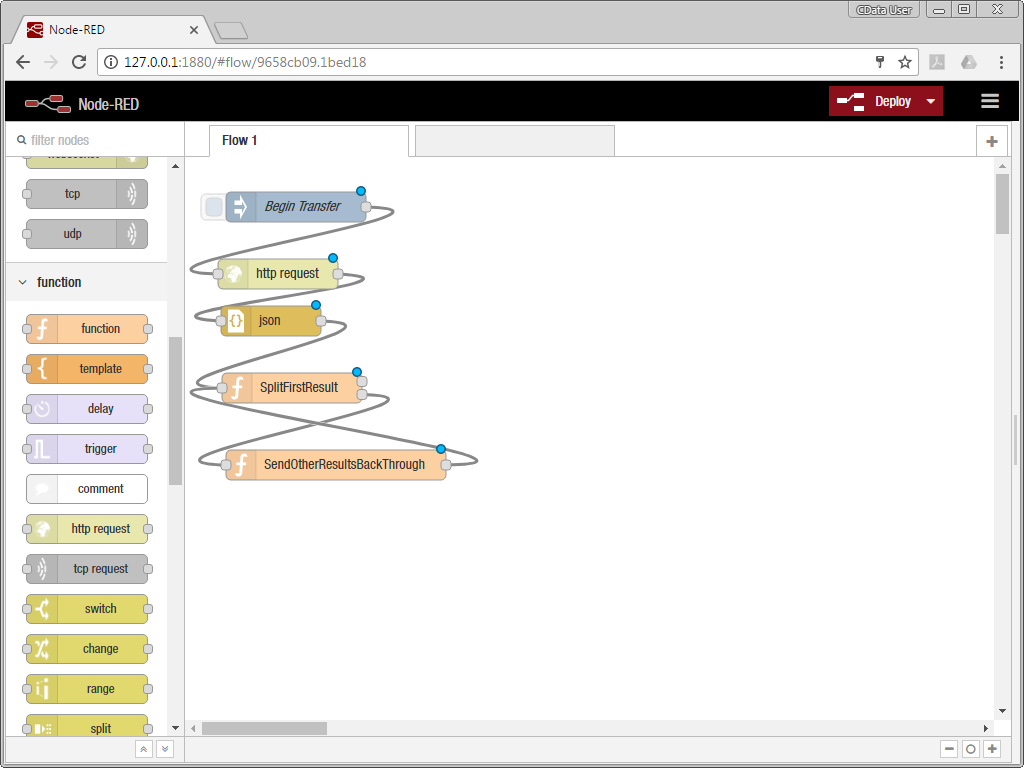
Create wires from the output of the json node to the input of the first new function node (SplitFirstResult), from the second output of SplitFirstResult to the input of our second new function node (SendOtherResultsBackThrough), and from the output of SendOtherResultsBackThrough to the input of SplitFirstResult.
Search for Existing Customers in QuickBooks Online
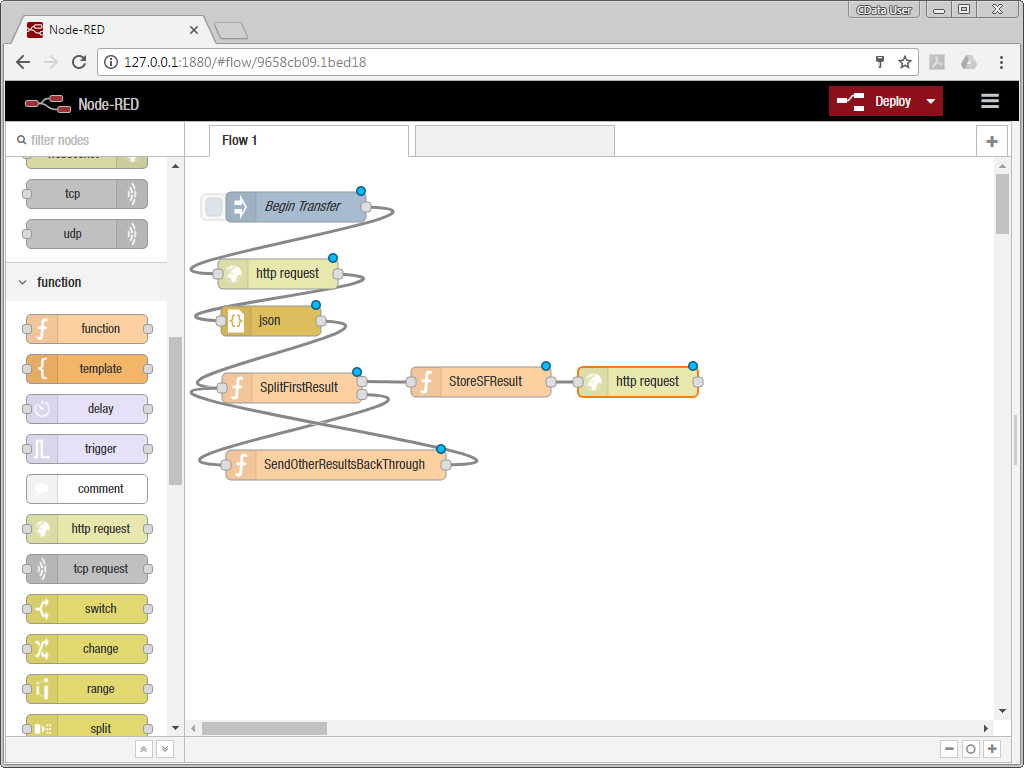
Drag another function node and another http request node onto the workspace. The function node moves the Salesforce Account information from msg.payload to msg.salesforceResult. Copy the following JavaScript into the function:
msg.headers = {};
msg.salesforceResult=msg.payload;
return msg;
The http request node searches QuickBooks Online for any existing customers with the same name as the Salesforce account. Configure the URL for the node to point to the QuickBooks Online Customer endpoint, using an OData $filter parameter to look for any existing customers (note the triple-bracket around escapedName in the filter), and set the username and password as you did for the previous http request node.
QuickBooks Online Customers Endpoint with Filter
http://localhost:8153/api.rsc/QBO_Customers/?$filter=(DisplayName eq '{{{escapedName}}}')Create a wire from the first output of the SplitFirstResult function to the input your new function (StoreSFResult) and from the output of StoreSFResult to your new http request node.
Determine Whether to Add or Update
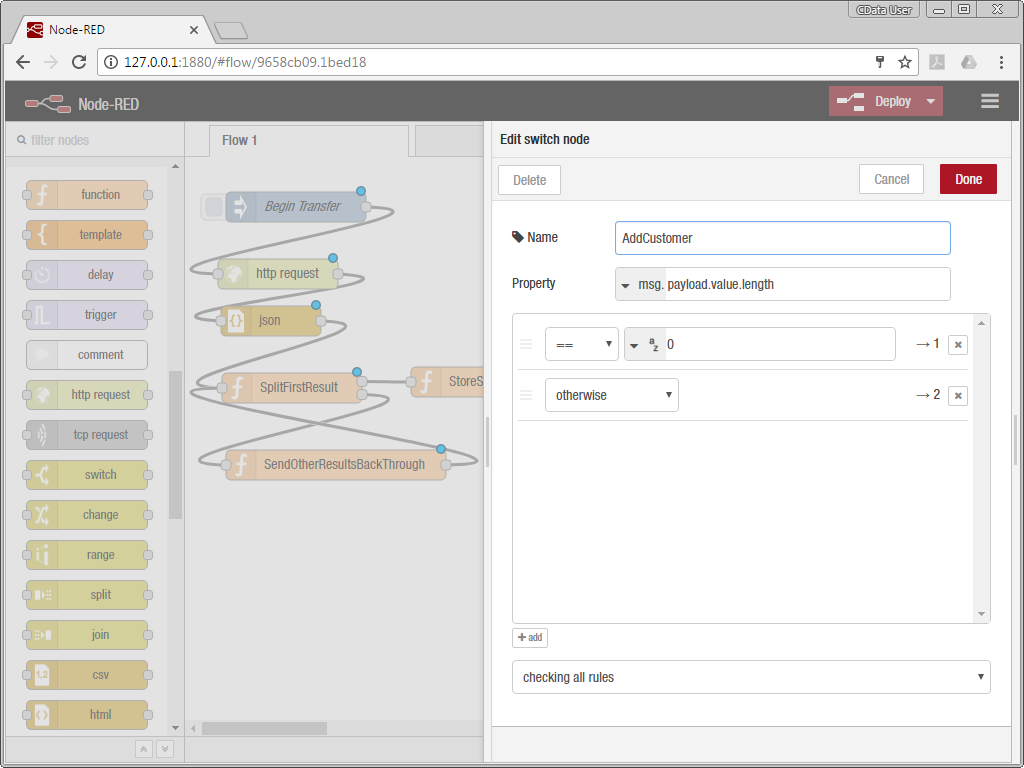
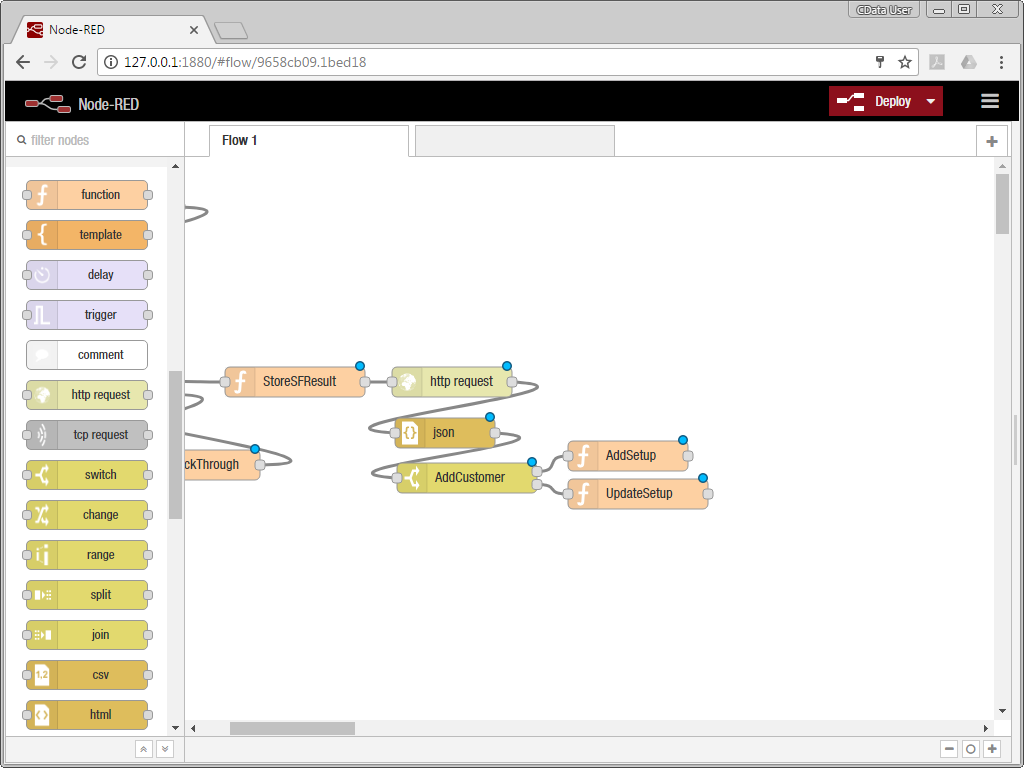
Next, drag a json node, a switch node, and two new function nodes onto the dashboard. The json node is there to parse the response from the API Server and the switch splits our flow based on whether we found an existing customer in QuickBooks Online or not:
The first function node (AddSetup) simply clears existing headers in preparation for the next HTTP request and sets a flag to add to true. Copy the following JavaScript into the function:
if (msg.salesforceResult) {
  msg.headers = {};
  msg.add = true;
  return msg;
}
return null;
The second function node (UpdateSetup) clears the existing headers, stores the existing customer's ID, and sets the flag to add to false. Copy the following JavaScript into the function:
if (msg.salesforceResult &&
    (typeof msg.payload.value[0].Id == 'string')) {
  msg.headers = {};
  msg.customerId = msg.payload.value[0].Id ;
  msg.add = false;
  return msg;
}
return null;
Create a wire from the output of the http request node to the input of the json node, from the output of the json node to the input of the AddCustomer switch node, and from output 1 and 2 of AddCustomer to the input of AddSetup and UpdateSetup, respectively.
Map the Salesforce Account to a QuickBooks Online Customer
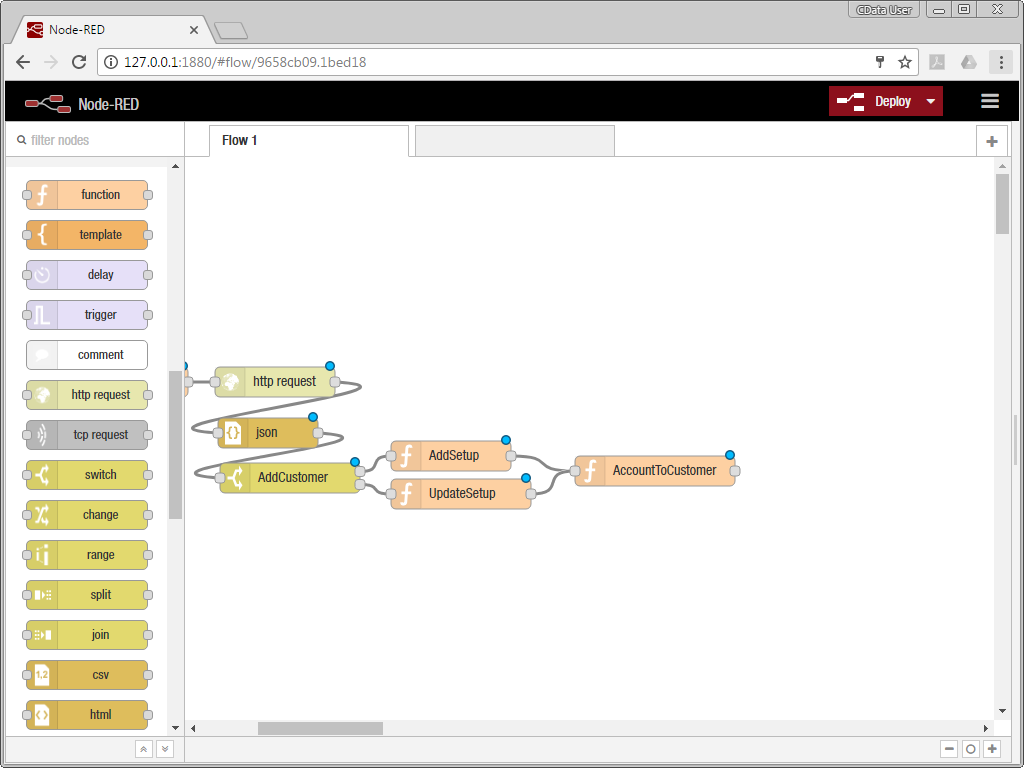
Drag a new function node to the workspace. This function maps the relevant fields from a Salesforce Account to a QuickBooks Online Customer. If the customer is new, then the DisplayName is include, otherwise it is ignored. Copy the following JavaScript to the new function node (AccountToCustomer):
var customer = {};
var account = msg.salesforceResult;

if (account.Name && (msg.add))
  customer.DisplayName = account.Name;

if (account.Active__c)
  customer.Active = account.Active__c;
if (account.BillingCity)
  customer.BillAddr_City = account.BillingCity;
if (account.BillingCountry)
  customer.BillAddr_Country = account.BillingCountry;
if (account.BillingState)
  customer.BillAddr_CountrySubDivisionCode = account.BillingState;
if (account.BillingLatitude)
  customer.BillAddr_Lat = account.BillingLatitude;
if (account.BillingStreet)
  customer.BillAddr_Line1 = account.BillingStreet;
if (account.BillingLongitude)
  customer.BillAddr_Long = account.BillingLongitude;
if (account.BillingPostalCode)
  customer.BillAddr_PostalCode = account.BillingPostalCode;
if (account.CurrencyIsoCode)
  customer.CurrencyRef = account.CurrencyIsoCode;
if (account.fax)
  customer.Fax_FreeFormNumber = account.fax;
if (account.Phone)
  customer.PrimaryPhone_FreeFormNumber = account.Phone;
if (account.ShippingCity)
  customer.ShipAddr_City = account.ShippingCity;
if (account.ShippingCountry)
  customer.ShipAddr_Country = account.ShippingCountry;
if (account.ShippingState)
  customer.ShipAddr_CountrySubDivisionCode = account.ShippingState;
if (account.ShippingLatitude)
  customer.ShipAddr_Lat = account.ShippingLatitude;
if (account.ShippingStreet)
  customer.ShipAddr_Line1 = account.ShippingStreet;
if (account.ShippingLongitude)
  customer.ShipAddr_Long = account.ShippingLongitude;
if (account.ShippingPostalCode)
  customer.ShipAddr_PostalCode = account.ShippingPostalCode;
if (account.Website)
  customer.WebAddr_URI = account.Website;

msg.payload = customer;
return msg;
Create wires from the outputs of AddSetup and UpdateSetup to the input of AccountToCustomer:
Create a New Customer or Update an Existing Customer
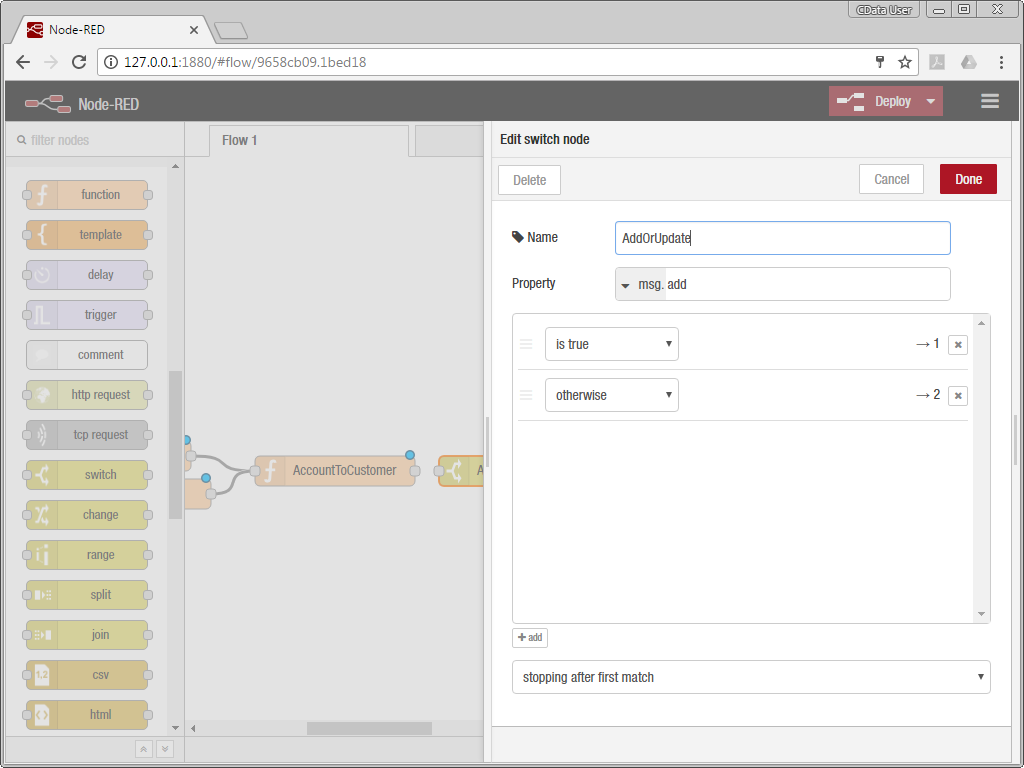
Drag a new switch node and two new http request nodes onto the dashboard. The switch node determines whether the flow sends an HTTP request to the API Server to add a new QuickBooks Online customer or an HTTP request to update an existing one.
To determine whether to add or update, configure the switch node based on msg.add:
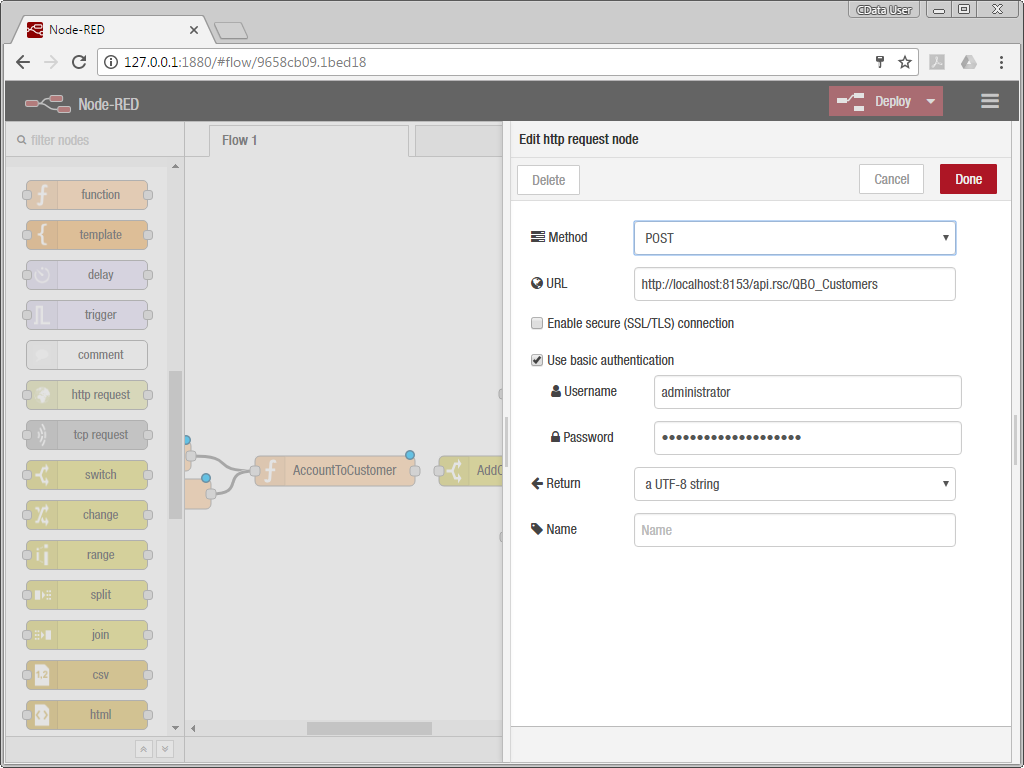
The first http request node adds a new customer to QuickBooks Online. To do so, send an HTTP POST request to the QuickBooks Online Customer endpoint on the API Server, where msg.payload is the request body.
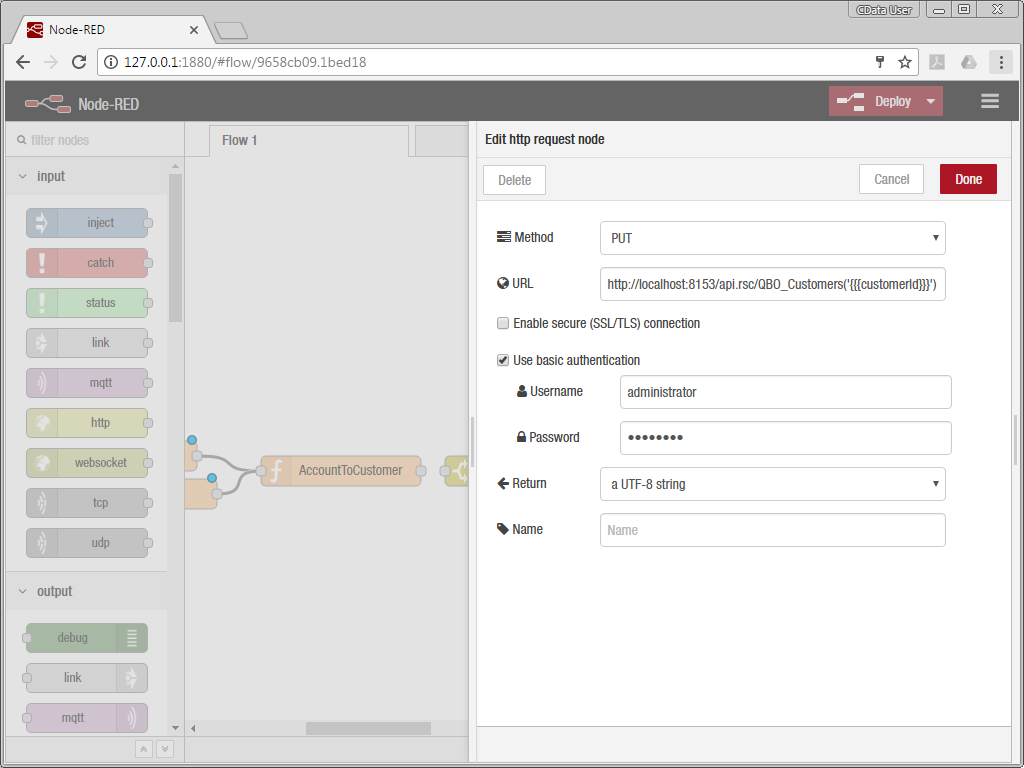
To update a QuickBooks Online customer, send an HTTP PUT request to the QuickBooks Online Customer endpoint on the API Server, with msg.customerId used to designate which customer to update. Again msg.payload is the request body.
Complete the Flow by creating wires from the output of AccountToCustomer to the input of AddOrUpdate, from the first output of AddOrUpdate to the input of the http request node used to add, and from the second output of AddOrUpdate to the input of the http request node used to update.
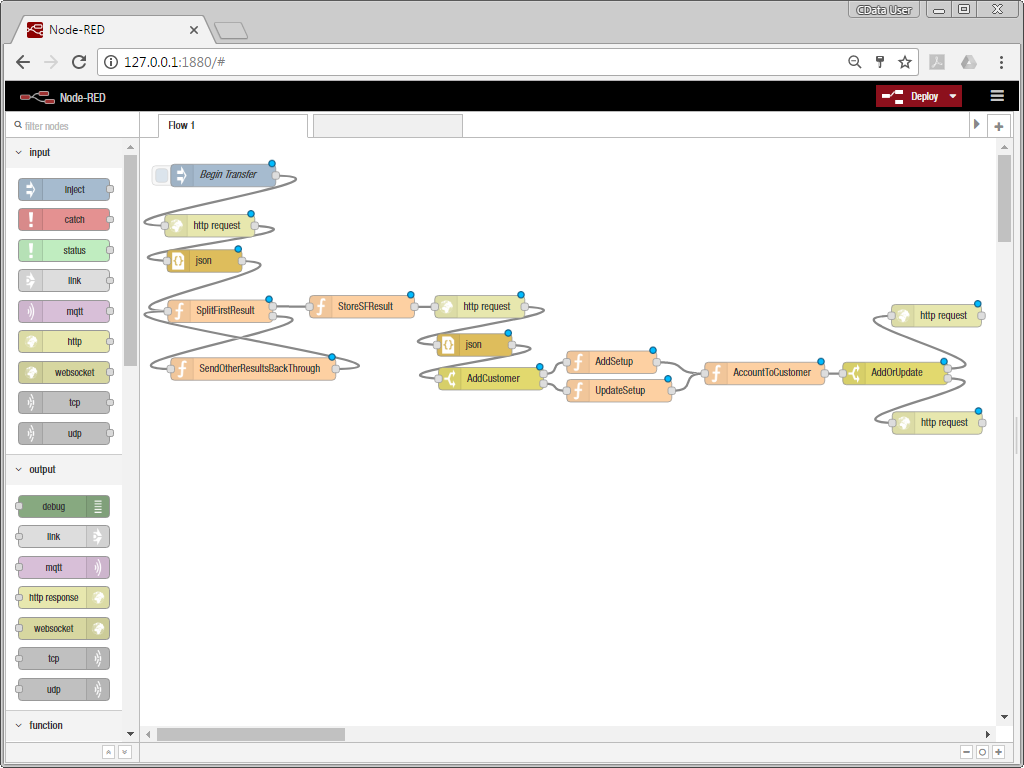
The Flow could easily be modified to work with any of the other 80+ data sources that are supported by the API Server
More Information & Free Trial
With all of the nodes and wires configured, deploy the flow and click the inject node to start the flow (or set a schedule to trigger the flow repeatedly). For more information on the API Server, check out our Knowledge Base article. Refer to the API Server landing page to download a free, 30 day trial. If you have any questions, our world-class support team is ready to help.


