Discover how a bimodal integration strategy can address the major data management challenges facing your organization today.
Get the Report →Configuring a Receive Location for the CData BizTalk Adapters
This section provides step-by-step instructions to create, configure, and test a static one-way receive location using a CData BizTalk Adapter for Salesforce. This article uses the adapter for Salesforce, but you can follow the same procedure for any CData adapter. You can use receive locations to automate actions in Salesforce. In the following sections, you will configure a Static One-Way Receive Location and use it to retrieve data from Salesforce every 60 seconds.
A receive location can execute SQL commands and create BizTalk messages that contain the results. If you want to execute updategram commands, use a send port. For more information on configuring the adapter in different messaging ports, see the "Adapter Configuration" chapter in the help documentation.
Create the Receive Port
To add a receive location to your application, you first need to add a receive port. Receive ports can receive data from multiple receive locations.
- If you have not already done so, open your application in the BizTalk Administration Console.
- In your application, right-click Receive Ports and click New -> Static One-Way Receive Port. The Receive Port Properties dialog is displayed.
- In the Name menu, enter a name for the receive port.
Create and Configure the Receive Location
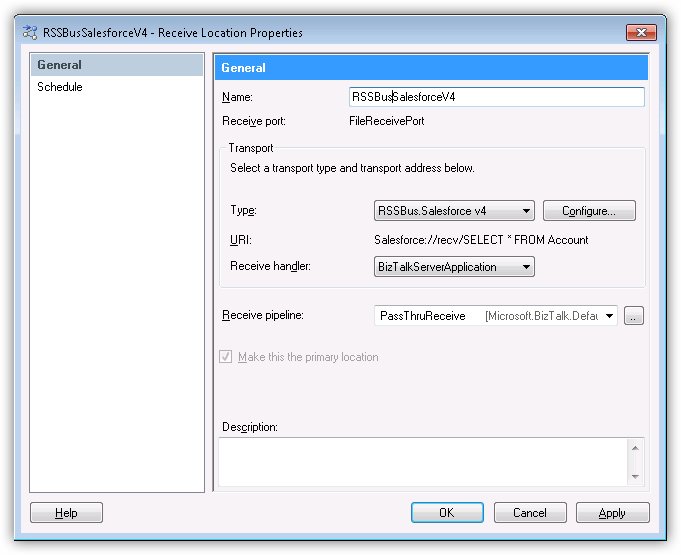
After you create the receive port, create the receive location and configure it to use the Salesforce adapter as its transport type.
- Right-click Receive Locations and click New -> One-Way Receive Location.
- Select the appropriate receive port of which the new receive location will be a member. The Receive Location Properties dialog is displayed.
- In the Name menu, enter a name for the receive location.
- In the Receive Location properties, select CData.Salesforce in the Transport Type menu.
- In the Receive pipeline menu, select the default option, PassThruReceive.

Configure the Adapter
Specify the command that the adapter will execute in the Transport Properties dialog.
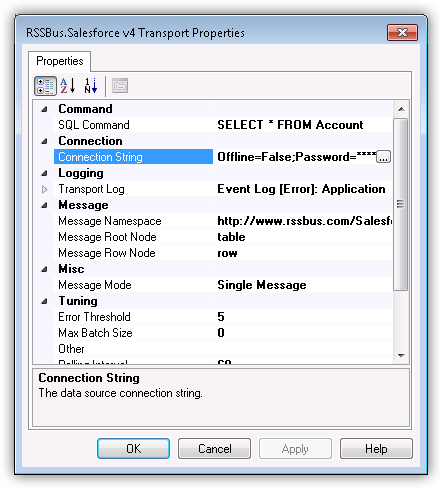
- In the receive location properties, click Configure. The Transport Properties dialog for the adapter is displayed.
- In the SQL Command property, enter the command. This example uses
SELECT * FROM Account
- Set the Polling Interval property to 60 seconds.
![]()
Refer to the "Adapter Configuration" chapter for the available adapter configuration properties.
Configure the Connection String
Set credentials and other connection properties in the Connection String Options dialog.
- In the receive location properties, click Configure. The adapter properties dialog is displayed.
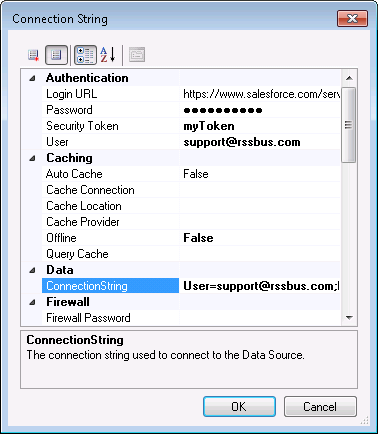
- Click the button in the Connection String property. The Connection String Options dialog is displayed.
- Enter connection properties. The required connection properties are the following:
- User
- Password
- Access Token
- Click Test Connection to verify the connection values and test connectivity.
Refer to the "Connection String Options" chapter in the help documentation for a description of the various properties and their functions.

Create a Send Port
The static one-way receive location is now ready for use with a send port: A send port must be associated with the BizTalk messages that are created by the receive location. See Configure a One-Way Send Port for the CData BizTalk Adapters and Configure a Solicit-Response Send Port for the CData BizTalk Adapters for guides on using send ports with any CData BizTalk Adapter.
Troubleshooting
To check if errors are occurring, expand the Event Viewer (Local) in the navigation tree in the administration console. Expand Windows Logs and select Applications.
A list of errors that have occurred will be available here. This will include error messages for all applications on the system, so it is important to check the source of the error message. For the receive location, the source should be the adapter. Details of the error message should provide insight into why the error is occurring.
For further guidance on resoling the error, contact [email protected].


