Discover how a bimodal integration strategy can address the major data management challenges facing your organization today.
Get the Report →Deploying CData Sync in a Kubernetes Environment
CData Sync provides automated, continuous replication of your enterprise data to any data store.
Containerization technology enables you to create applications rapidly and securely and to deploy your application containers to any infrastructure. However, manually installing and managing each container in your system can be time-consuming, error prone, and resource intensive. To avoid these issues, you need a tool that automates the processes for deployment, scaling, and managing your containerized applications.
Kubernetes, a popular open-source platform built on fifteen years of container-management experience at Google, solves those issues by automating and managing all processes that are involved in deployment and scaling of containerized applications. By deploying CData Sync in a Kubernetes environment, you can take advantage of Kubernetes’ orchestration functionality, including high availability (no downtime), scalability of loads, and backup-and-restore capabilities.
This article provides step-by-step instructions for deploying Sync in the Kubernetes environment, and it lists the tools that you need for that process.
Requirements
The following tools are required in order to deploy Sync in Kubernetes:
- Docker Desktop
- Windows System for Linux (WSL) 2
- Ubuntu (available from the Microsoft Store)
- kubectl command-line tool
- Azure Kubernetes Services (AKS)
- Microsoft Azure Command-Line Interface (CLI) - Windows
- Microsoft Azure Command-Line Interface (CLI) - Linux
- Docker on Ubuntu
Deploying CData Sync in a Kubernetes Environment
The basic steps for deploying Sync in Kubernetes are as follows:
- Gather resources and build a Docker image.
- Build a Docker container.
- Deploy the container to Kubernetes.
Each of these main steps are broken into multiple steps in the following sections:
Step 1: Gather Resources and Build a Docker Image
-
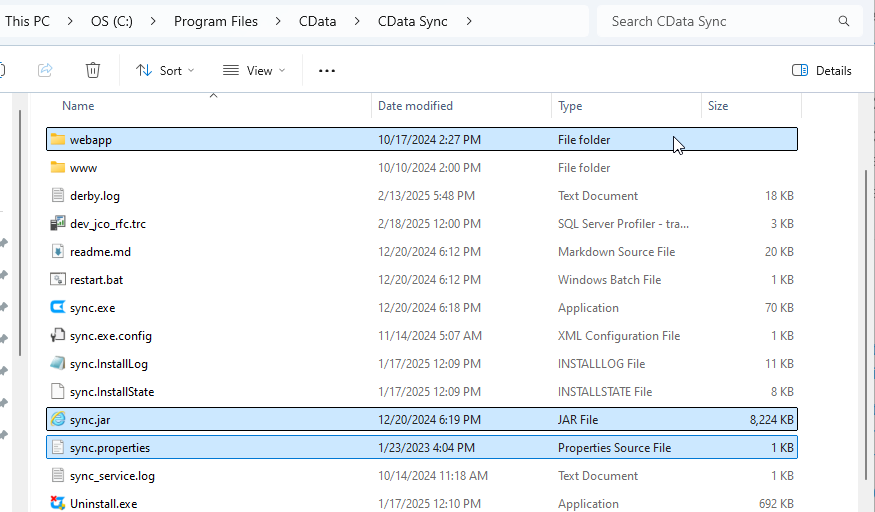
Create a new folder locally. Include the following items in this folder:
- sync.jar file
- sync.properties file
- webapp folder (which contains the sync.war file)
![Showing file structure]()
-
Create a file named Dockerfile in the same folder that you created in Step 1. Include the following content in that file:
FROM mcr.microsoft.com/openjdk/jdk:11-ubuntu # copy required files and fix permissions RUN mkdir -p /opt/sync/webapp WORKDIR /opt/sync/ COPY sync.jar sync.jar COPY webapp/sync.war webapp/sync.war COPY sync.properties /opt/sync/ RUN addgroup --system --gid 20000 cdatasync \ && adduser --system --uid 20000 --gid 20000 cdatasync \ && mkdir -p /var/opt/sync \ && chown -R cdatasync:cdatasync /var/opt/sync \ && chown -R cdatasync:cdatasync /opt/sync # change user and set environment USER cdatasync ENV APP_DIRECTORY=/var/opt/sync EXPOSE 8181 # run the app CMD ["java","-jar","sync.jar"] -
Create a database server to use as the application database (ApplicationDatabase).
-
Create a database (for example, a PostgreSQL database) in Azure:
az postgres server create --resource-group ResourceGroup --name ServerName
-
Add the credentials to the cdata.app.db configuration that is in the sync.properties file, as
shown below. (The sync.properties file resides in InstallationDirectory.)
cdata.app.db=jdbc:cdata:mysql:Server=ServerName;Database=DatabaseName;User=UserName;Password=Password;UseSSL=True;UseConnectionPooling=True;
-
Create a database (for example, a PostgreSQL database) in Azure:
-
Create an Azure volume for ApplicationDirectory.
-
Create the volume:
az storage account create --name AccountName --resource-group ResourceGroup --kind FileStorage --sku Premium_LRS
-
Retrieve the account keys and save these keys for use in later steps:
az storage account keys list --account-name AccountName
-
Create a file share on the storage account:
az storage share-rm create --resource-group ResourceGroup --storage-account AccountName --name ShareName --quota 100
-
Create the volume:
Step 2: Build a Docker Container
- Navigate in the shell (if you are not already there) to the local folder that you created earlier.
-
Build the Docker container.
docker build . -t sync
-
Run the container.
docker run -p 80:8181 -d sync
- Confirm that your image is running by opening your browser to http://localhost.
Step 3: Deploy the Docker Container to Kubernetes
- Create Kubernetes services on Azure
-
Login to your Azure account from a Microsoft Windows PowerShell. You should have the Azure CLI installed already.
az login
-
Navigate to your resource group in the Azure Kubernetes Service
and locate the container registry. You need this registry to
retrieve the login server.
-
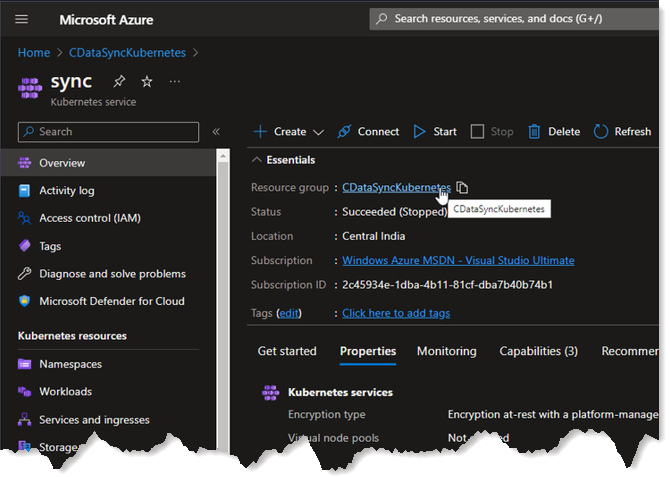
In your Azure Kubernetes Service, navigate to your
resource group.
![Navigating to resource group]()
-
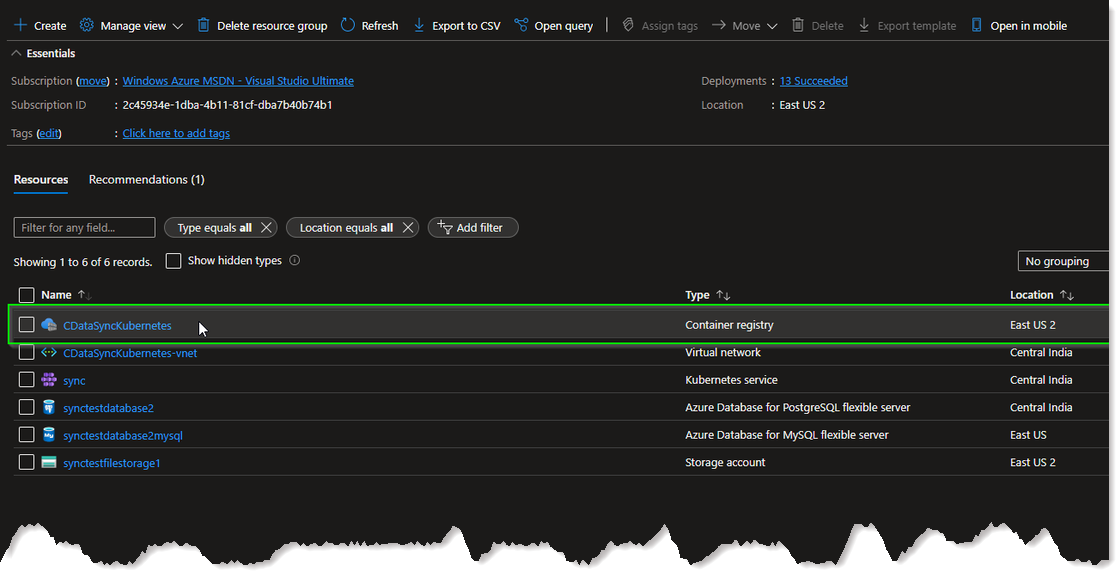
Locate the container registry that is inside the resource group.
![Locating container registry]()
-
The login server is available inside the container registry, as shown below:
![Showing login server]()
-
In your Azure Kubernetes Service, navigate to your
resource group.
-
Login to the container registry by using your username, password, and login server. (Note: The use of a username and password is optional.)
az acr login --name LoginServerName --username YourUserName --password YourPassword
-
Add a tag in the container registry by submitting these statements
docker tag image_name LoginServerName name:value docker push LoginServerName/name:value -
Navigate to the Kubernetes Service in Azure and click Connect. Then, Azure displays
the commands that must be run in order to connect to the cluster and apply changes.
![Navigating to the service]()
-
Validate the nodes by submitting this command:
kubectl get nodes
-
Create a manifest file of type YAML. Name the file sync.yaml. An example of this file is shown below.
apiVersion: apps/v1 kind: Deployment metadata: labels: name: cdata-http name: cdata-http spec: replicas: 1 selector: matchLabels: name: cdata-http template: metadata: labels: name: cdata-http spec: containers: - name: cdata-http image: cdatasynckubernetes.azurecr.io/syncv22:v4 imagePullPolicy: Always ports: - name: http containerPort: 8181 protocol: TCP --- apiVersion: v1 kind: Service metadata: name: service-http spec: selector: name: cdata-http ports: - protocol: TCP port: 80 targetPort: 8181 type: LoadBalancer -
Deploy this YAML file to the cluster.
kubectl apply -f sync.yaml
-
Retrieve the external IP address for the service.
kubectl get all
With these steps completed, you should be able to connect to Sync at http://External-IP.
Free Trial & More Information
Now that you have seen how to deploy Sync in the Kubernetes environment, visit our CData Sync page to read more information about CData Sync and download a free trial. Start consolidating your enterprise data to a cloud data warehouse today! As always, our world-class Support Team is ready to answer any questions you may have.


