Discover how a bimodal integration strategy can address the major data management challenges facing your organization today.
Get the Report →Create an SAP BusinessObjects Universe on the CData JDBC Driver for Adobe Commerce
Provide connectivity to Adobe Commerce data through an SAP BusinessObjects universe.
This article shows how to use the CData JDBC Driver for Adobe Commerce to connect to Adobe Commerce from SAP BusinessObjects Business Intelligence applications. You will use the Information Design Tool to analyze Adobe Commerce data and create a universe on the CData JDBC Driver for Adobe Commerce. You will then connect to the universe from Web Intelligence.
Create the JDBC Connection to Adobe Commerce
Follow the steps below to create a connection to the Adobe Commerce JDBC data source in the Information Design Tool.
- Copy the CData JAR and .lic file into the following subfolder in the installation directory for BusinessObjects: dataAccess\connectionServer\jdbc\drivers\jdbc. The CData JAR is located in the lib subfolder of the installation directory.
- Right-click your project and click New -> New Relational Connection.
- In the wizard that results, click Generic -> Generic JDBC datasource -> JDBC Drivers.
- On the next page of the wizard enter the connection details.
On the next page, set the Authentication Mode option to "Use specified username and password". Enter the username, password, and JDBC URL. The JDBC URL begins with jdbc:adobe commerce: and is followed by a semicolon-separated list of connection properties.
Adobe Commerce uses the OAuth 1 authentication standard. To connect to the Adobe Commerce REST API, you will need to obtain values for the OAuthClientId, OAuthClientSecret, and CallbackURL connection properties by registering an app with your Adobe Commerce system. See the "Getting Started" section in the help documentation for a guide to obtaining the OAuth values and connecting.
You will also need to provide the URL to your Adobe Commerce system. The URL depends on whether you are using the Adobe Commerce REST API as a customer or administrator.
Customer: To use Adobe Commerce as a customer, make sure you have created a customer account in the Adobe Commerce homepage. To do so, click Account -> Register. You can then set the URL connection property to the endpoint of your Adobe Commerce system.
Administrator: To access Adobe Commerce as an administrator, set CustomAdminPath instead. This value can be obtained in the Advanced settings in the Admin menu, which can be accessed by selecting System -> Configuration -> Advanced -> Admin -> Admin Base URL.
If the Use Custom Admin Path setting on this page is set to YES, the value is inside the Custom Admin Path text box; otherwise, set the CustomAdminPath connection property to the default value, which is "admin".
Built-in Connection String Designer
For assistance in constructing the JDBC URL, use the connection string designer built into the Adobe Commerce JDBC Driver. Either double-click the JAR file or execute the jar file from the command-line.
java -jar cdata.jdbc.adobe commerce.jarFill in the connection properties and copy the connection string to the clipboard.
![Using the built-in connection string designer to generate a JDBC URL (Salesforce is shown.)]()
When you configure the JDBC URL, you may also want to set the Max Rows connection property. This will limit the number of rows returned, which is especially helpful for improving performance when designing reports and visualizations.
A typical JDBC URL is below:
jdbc:adobe commerce:OAuthClientId=MyConsumerKey;OAuthClientSecret=MyConsumerSecret;CallbackURL=http://127.0.0.1:33333;Url=https://myAdobe Commercehost.com;InitiateOAuth=GETANDREFRESH- Enter the driver class: cdata.jdbc.adobe commerce.Adobe CommerceDriver
- Finish the wizard with the default values for connection pooling and custom parameters.
Analyze Adobe Commerce Data in the Information Design Tool
You can use the JDBC connection to analyze Adobe Commerce data in the Information Design Tool.
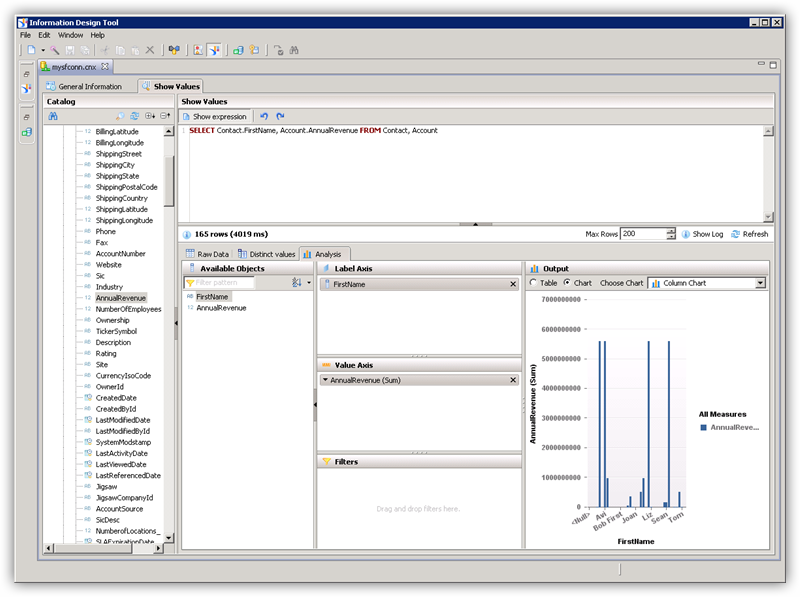
- In the Local Projects view, double-click the connection (the .cnx file) to open the Adobe Commerce data source.
- On the Show Values tab, you can load table data and enter SQL queries. To view table data, expand the node for the table, right-click the table, and click Show Values. Values will be displayed in the Raw Data tab.
- On the Analysis tab, you can then analyze data by dragging and dropping columns onto the axes of a chart.

Publish the Local Connection
To publish the universe to the CMS, you additionally need to publish the connection.
- In the Local Projects view, right-click the connection and click Publish Connection to a Repository.
- Enter the host and port of the repository and connection credentials.
- Select the folder where the connection will be published.
- In the success dialog that results, click Yes to create a connection shortcut.
Create a Universe on the JDBC Driver for Adobe Commerce
You can follow the steps below to create a universe on the JDBC driver. The universe in this example will be published to a repository, so it uses the published connection created in the previous step.
- In the Information Design Tool, click File->New Universe.
- Select your project.
- Select the option to create the universe on a relational data source.
- Select the shortcut to the published connection.
- Enter a name for the Data Foundation.
- Import tables and columns that you want to access as objects.
- Enter a name for the Business Layer.
Publish the Universe
You can follow the steps below to publish the universe to the CMS.
- In the Local Projects view, right-click the business layer and click Publish -> To a Repository.
- In the Publish Universe dialog, enter any integrity checks before importing.
- Select or create a folder on the repository where the universe will be published.
Query Adobe Commerce Data in Web Intelligence
You can use the published universe to connect to Adobe Commerce in Web Intelligence.
- Copy the cdata.jdbc.adobe commerce.lic file to the following subfolder in the BusinessObjects installation directory: \dataAccess\connectionServer\jdbc\drivers\jdbc. The license file is located in the lib subfolder of the installation directory.
- Open Web Intelligence from the BusinessObjects launchpad and create a new document.
- Select the Universe option for the data source.
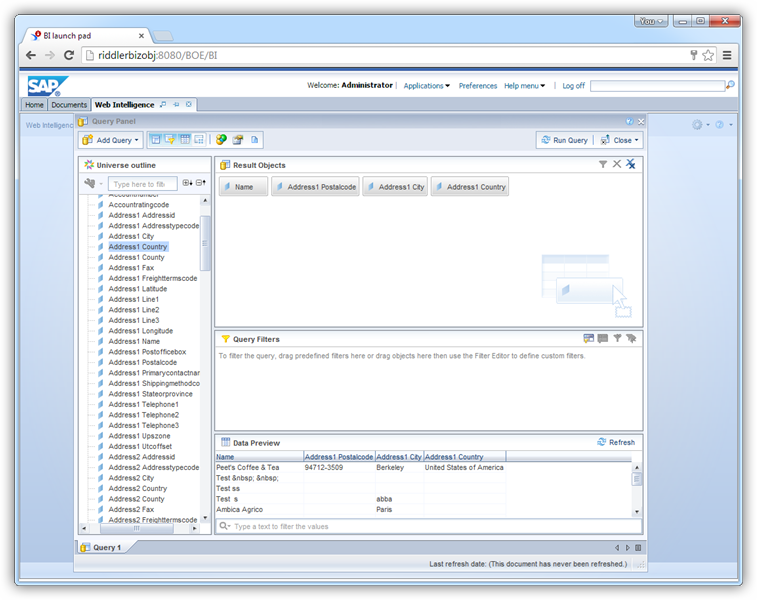
- Select the Adobe Commerce universe. This opens a Query Panel. Drag objects to the Result Objects pane to use them in the query.


