Discover how a bimodal integration strategy can address the major data management challenges facing your organization today.
Get the Report →How to Generate SQL Command Schemas for the CData BizTalk Adapter for EnterpriseDB
The CData BizTalk Adapter makes it easy to process EnterpriseDB data in BizTalk by returning the data as XML. You can use this data in a BizTalk orchestration by creating an XML schema file for the table you want to access in BizTalk.
This article will show how to generate a schema to process EnterpriseDB data retrieved using the CData BizTalk Adapter. You will generate a schema for a SELECT command.
This guide shows how to use the CData BizTalk Adapter for EnterpriseDB to execute SQL commands to EnterpriseDB.
Add the Adapter for EnterpriseDB to Your Project
Follow the steps below to add the adapter to a BizTalk Server project.
- If you have not already done so, create a new BizTalk Server project in Visual Studio.
- Right-click on the project in the Solution Explorer and click Add -> Add Generated Items.
- Select Add Adapter Metadata in the resulting dialog box.
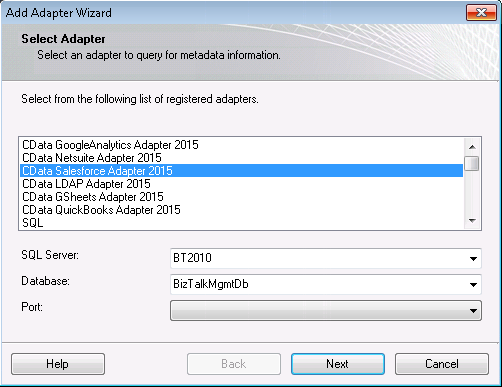
- In the resulting Add Adapter wizard, select the adapter from the list.
- In the Port menu, leave the selection blank. You can also select a receive location or send port that has the adapter configured as its transport type.
![CData Adapters in the Select Adapter wizard. (Salesforce is shown.)]()
Generate a Schema for an SQL Command
After you select the adapter in the Add Adapter wizard, the Schema wizard is displayed. Follow the steps below to configure connection properties and retrieve the metadata for the results of the command.
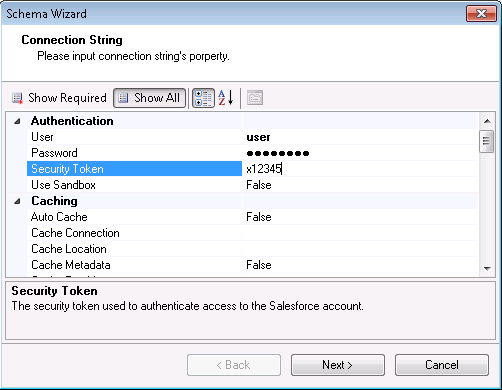
- In the Connection String page, enter authentication credentials and other connection properties, if you did not select an adapter that you have already configured in your BizTalk application. Below is a typical connection string:
User=postgres;Password=admin;Database=postgres;Server=127.0.0.1;Port=5444The following connection properties are required in order to connect to data.
- Server: The host name or IP of the server hosting the EnterpriseDB database.
- Port: The port of the server hosting the EnterpriseDB database.
You can also optionally set the following:
- Database: The default database to connect to when connecting to the EnterpriseDB Server. If this is not set, the user's default database will be used.
Connect Using Standard Authentication
To authenticate using standard authentication, set the following:
- User: The user which will be used to authenticate with the EnterpriseDB server.
- Password: The password which will be used to authenticate with the EnterpriseDB server.
Connect Using SSL Authentication
You can leverage SSL authentication to connect to EnterpriseDB data via a secure session. Configure the following connection properties to connect to data:
- SSLClientCert: Set this to the name of the certificate store for the client certificate. Used in the case of 2-way SSL, where truststore and keystore are kept on both the client and server machines.
- SSLClientCertPassword: If a client certificate store is password-protected, set this value to the store's password.
- SSLClientCertSubject: The subject of the TLS/SSL client certificate. Used to locate the certificate in the store.
- SSLClientCertType: The certificate type of the client store.
- SSLServerCert: The certificate to be accepted from the server.
![The connection string properties used by the adapter. (Salesforce is shown.)]()
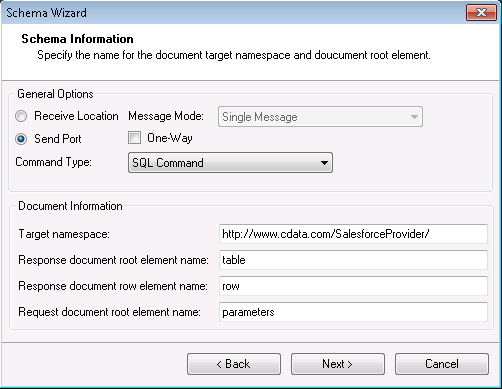
- In the General Options section on the next page, Schema Information, select Send Port or Receive Location, depending on the adapter configuration.
- If you want to generate the schema for the entire result set, select the Single Message option in the Message Mode menu. If you want to generate one schema for each row in the result set, select the Message Per Row option and confirm that the root element of the message is 'row'.
- In the Command Type menu, select SQL Command.
![A Receive Location configured in the Schema wizard. (Salesforce is shown.)]()
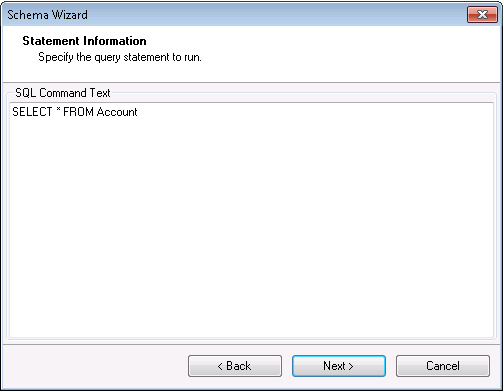
In the SQL Command Text box on the Statement Information page, enter an SQL command. (If you have configured a receive location or send port, the SQL command you configured is entered in the box.) This example uses the query below:
SELECT ShipName, ShipCity FROM Orders WHERE ShipCountry = 'USA'![The SQL command for which the XML schema will be generated. (Salesforce is shown.)]()
- Confirm the settings in the summary displayed by the wizard and click Finish to generate the schema.xsd file.
Processing Schemas
To use schemas in a simple BizTalk application, see the tutorial.


